Sassy and Sexy Pin Up Beehive
@emilyolyvia
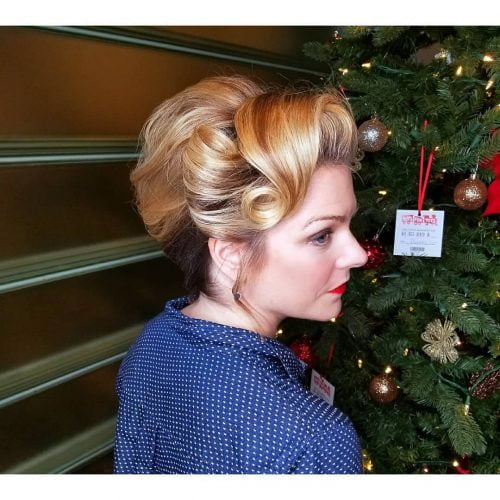
A sassy and sexy hairdo perfect for any retro themed party! The only things you’ll need to recreate this gorgeous look is lots of hairspray and creativity!
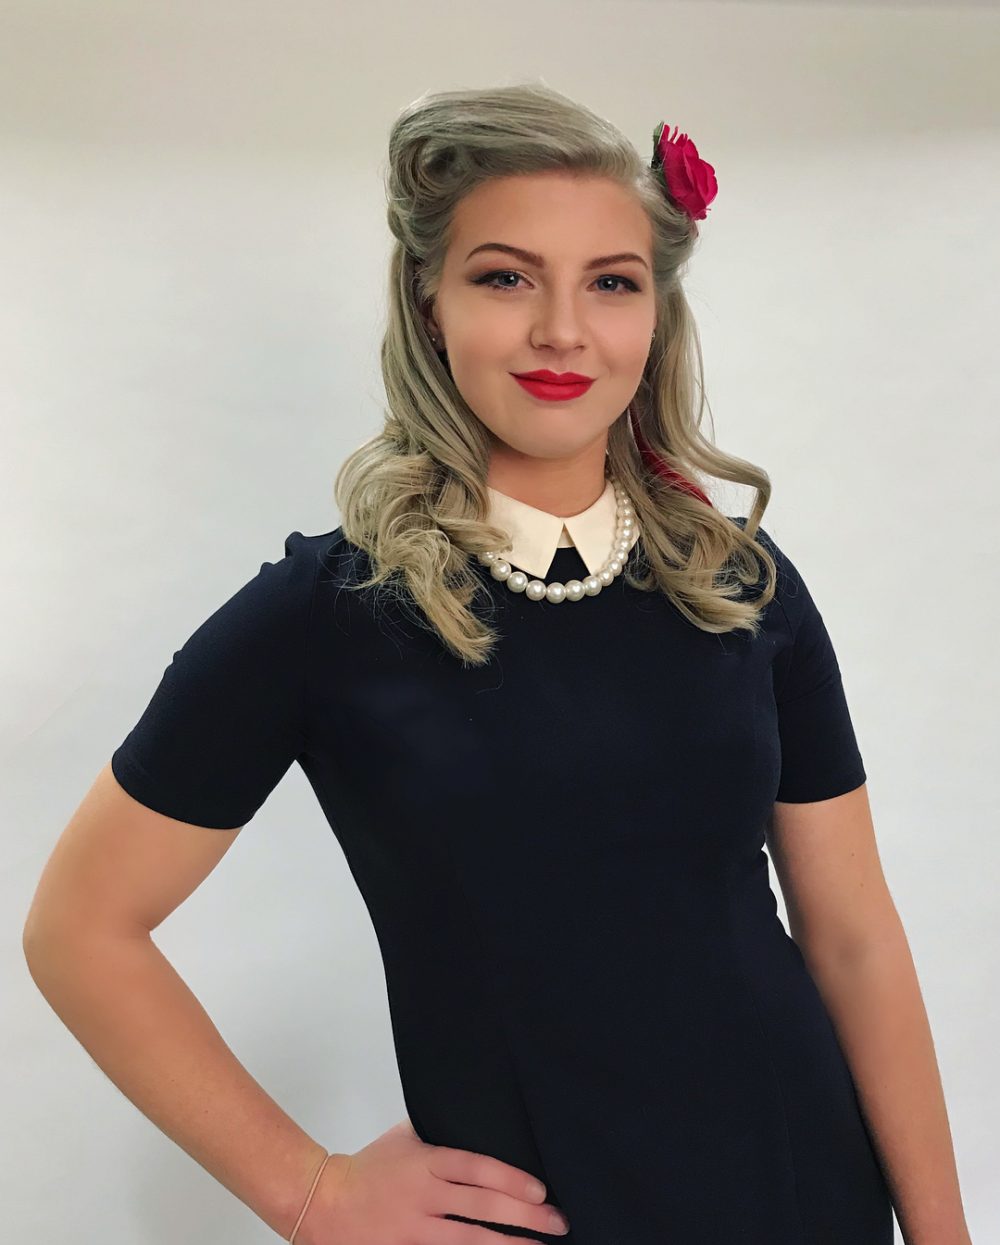
Classic 50s Style
Q&A with style creator, Elizabeth Otter
Training Hair and Media Make-up Artist in South Yorkshire, UK
How would you describe this look?
I’d describe this look as a really classic 50s style, the sort you see on advertisements and posters from around that time period.
My favorite thing about this look is that it’s one of those styles that is so simple and classic to recreate, but it looks like you’ve spent a ridiculous amount of time styling the hair.
Any advice for someone considering it?
If possible, start with hair that’s not freshly washed because it will hold the curls better and make the victory roll so much easier to create. When creating the curls, use a heated wand then put them in pin curl clips for about 20 to 30 minutes to let them set. This will help you really get that bouncy curl.
Use a bristle brush to gently soften the curls. If you have hair that is prone to frizz, smooth a small amount pomade through with your fingers. This will keep your curls smooth and shiny, and stop the hair from frizzing when brushing the curls.
Modern Victory Roll
Q&A with style creator, Melanie Saso
Hairstylist / Salon Owner @ Bombshell Beauty Boutique in Mendota, IL
How would you describe this look?
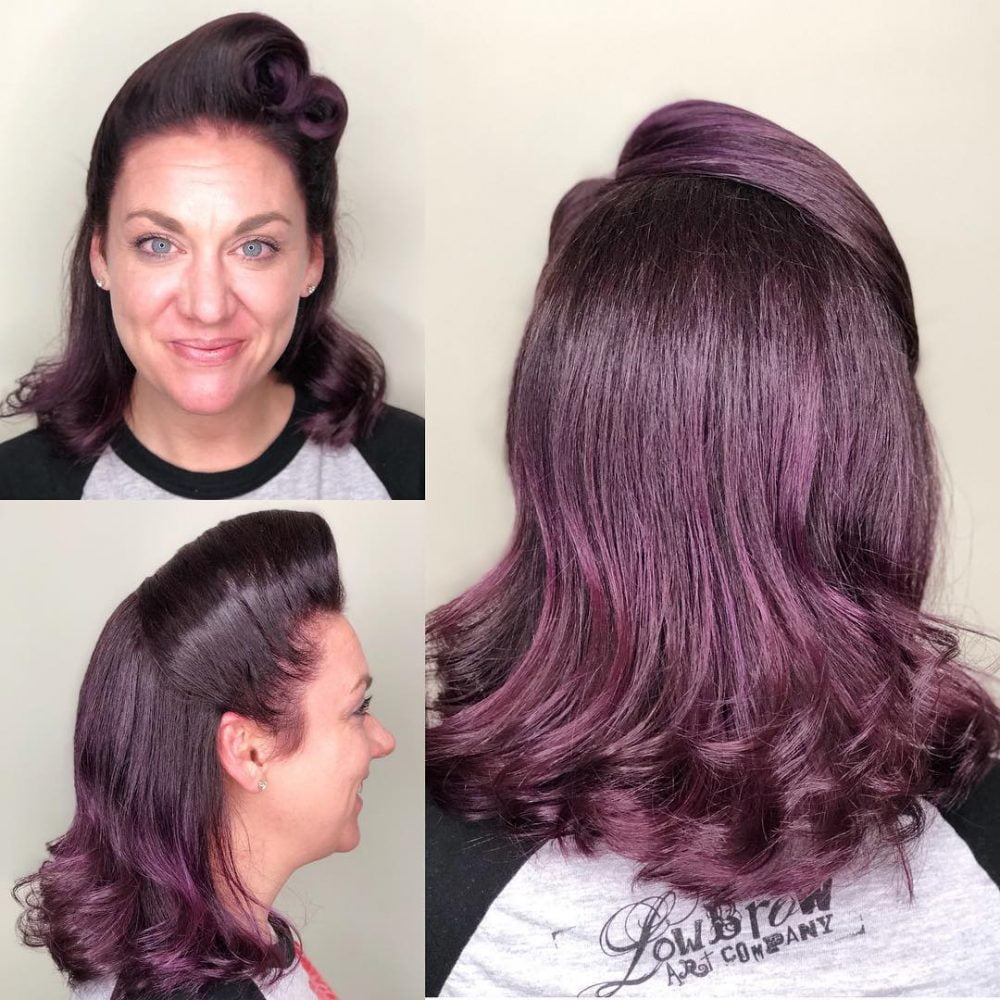
This look is simply a modern twist on a very classic 1940s victory roll style.
I love this look because of its versatility. It can be worn with jeans and a t-shirt for a rockabilly look, but it’s classy enough to be paired with a dress for day or evening wearability as well.
Any advice for someone considering it?
I think this is a great look for a beginner or someone with an advanced skill set. The best advice I can give when it comes to creating rolls is, when you think you’ve teased it enough, tease it a little more. I find that most people are afraid to tease their hair. With vintage styling, I find teasing key. I recommend using a texturizing power like Puff.Me at the roots then teasing with a “C”-shaped motion. Lightly brush out the surface and use a pomade or wax to smooth flyaways.
Use caution when placing your pins to hide them and finish with a firm hold hairspray. If you struggle with frizz, this look can still appear very authentic with a more natural shape (and very little product) as opposed to these very smooth rolls. A quick curl of the ends really pulls this look together. You can add a scarf or a flower as well.
Prepare for the compliments! This classic look is sure to turn heads and get people talking. Put on your favorite lipstick you’ll be grinning a lot in this updo!
Modern Flapper
Q&A with style creator, Andrea Rees
Goldwell Regional Artist @ Taglio Salon in Natick, MA
How would you describe this look?
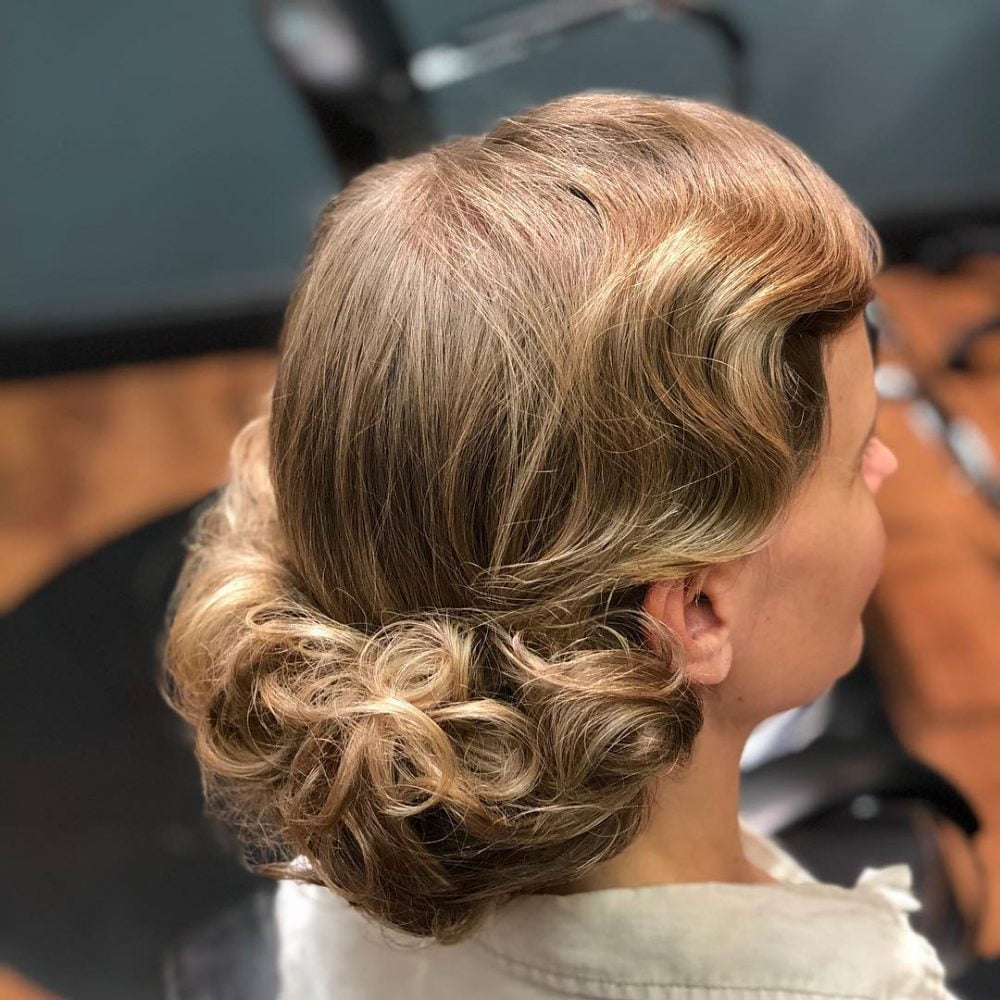
This is a modern take on the retro pin-up or flapper style. It is softer than traditional fingerwaves because it was set with a 3/4-inch iron and then formed into the waves. It’s so classic and glamorous!
My favorite part is how the waves frame her face and transition back into the chignon. It’s set, but it doesn’t look stiff. It has a softness to it.
Any advice for someone considering it?
This isn’t a style that you can do easily on yourself. I struggled when I did my own for Halloween. It took me two hours to get it right! It’s so much easier to do on someone else.
First, you need good heat protection. I used Goldwell Style Sign Twist Around spray which is designed specifically for heat setting curls. The density of the hair will determine the size of the wave pattern you can wear, but it works on all types of hair.
There’s something sassy about this look. The women I’ve done it on have all had such great reactions to seeing it on themselves. It’s like it gives them permission to be a bit cheeky. When you think flapper or pin-up, there’s definitely an attitude associated with it. One thing I would definitely tell my client is that this isn’t your everyday look. The outfit has to match! I’m not saying you need to wear a flapper dress or a pin-up corset, but this is a classic look and you wouldn’t want to pair it with something too modern.
Classic Retro Glam
Q&A with style creator, Katrina Crump
Master Stylist @ Kat’s Kreations in Calgary, AB
How would you describe this look?
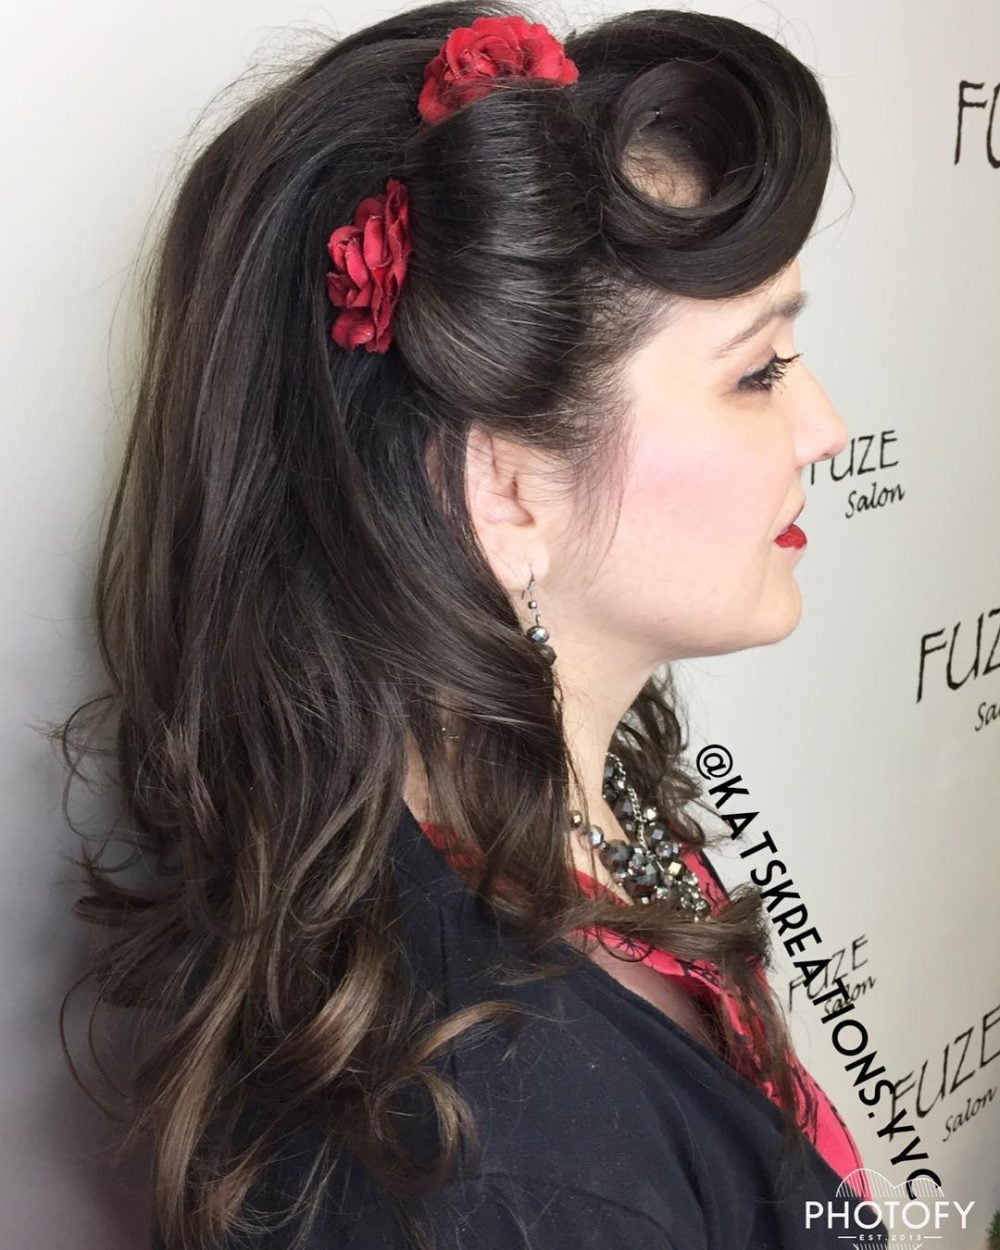
This look is one of my favorites because it is so easy to create and doesn’t take a lot of time to actually style. I consider it to be a classic retro look due to the ease and versatility.
This look can be worn dressed up or dressed down. It’s a classic style for any 50/60s glam fan due to the victory rolls.
Any advice for someone considering it?
This look can be created with a curling iron, but if someone has fine hair I highly recommend using rollers for more volume and longevity of the curls. If using a curling iron, definitely clip each curl in a barrel formation after it has been curled to allow each curl to cool completely before you start working with the style.
Using a thermal spray in the hair before you apply any heat will help the style last longer as well as protect the hair from heat damage. I used Joico Iron Clad. Apply the thermal spray immediately before you curl or put rollers in in dry hair. If using rollers, allow hair to completely cool before you take them out.
Once curls are created, use a light hairspray all over. To create your victory rolls, backcomb each section to build a base for the curl to be clipped into. Smooth out any flyalways that are visible. Once finished, spray everything with a shine spray and finishing hairspray. I used Joico Flip Turn Hairspray and Kevin Murphy Shine Spray.
This look can be great for ANYONE who has medium to longer length hair. Face shape will only affect the size of the victory curls, as smaller faces can get away with slightly bigger ones. For longer faces, I wouldn’t suggest a lot of volume on the top of the head, but more on the sides.
This look takes about an hour from start to finish to create. Once the curls are created, the actual style itself takes about 15-20 minutes.
Double Victory Roll
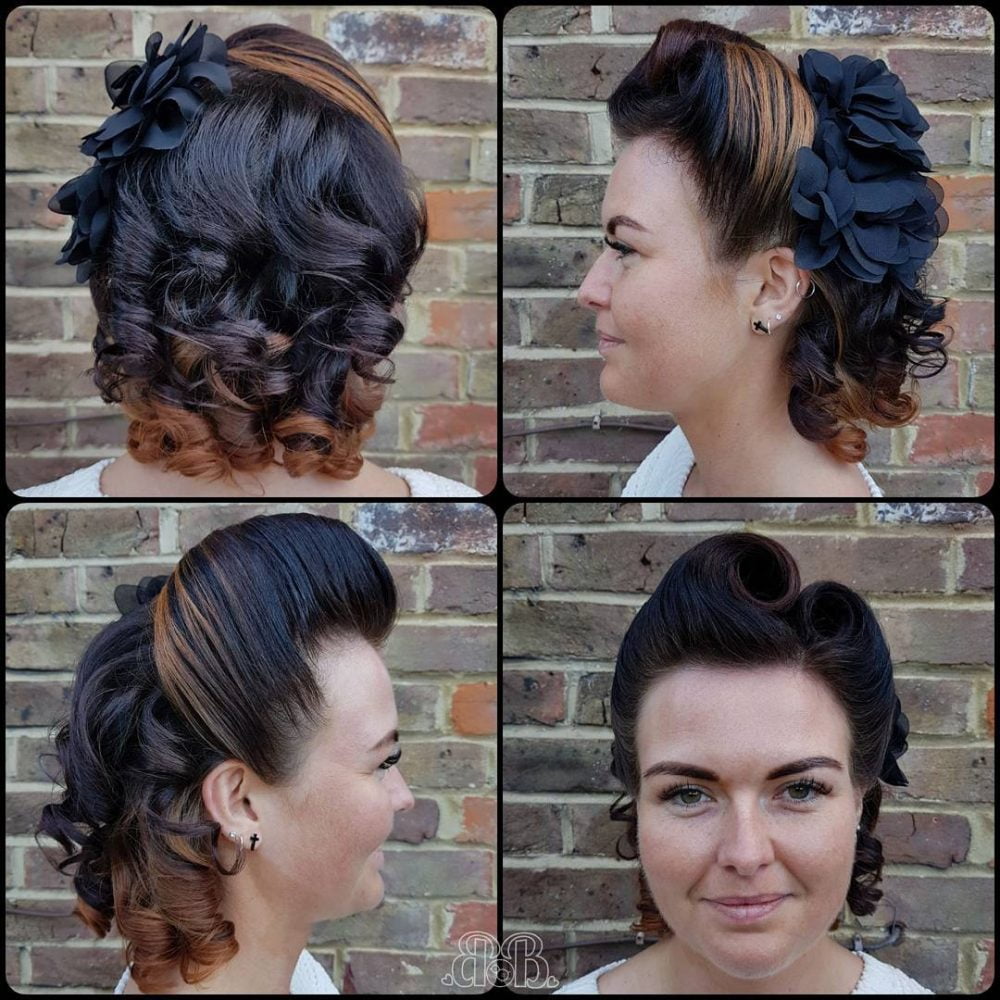
Q&A with style creator, Abigail Pope
Freelance Hairstylist @ Belles and Brides in West Sussex, UK
How would you describe this look?
This style is a double victory roll that is such a classic vintage style. My favorite thing about it is how you can change it up to suit who you are and always look like a pin-up goddess. Add more rolls or even take one away, the sky is the limit!
Any advice for someone considering it?
The most important piece of advice for anyone wanting to rock the victory roll is to embrace the backcombing! There needs to be a lot of great backcombing, held with strong hold hairspray. Do this in small sections for the best results, smooth the outside with pomade ,and hide those bobby pins. This means that even girls with thin hair can get involved!
You can certainly style a roll using straight hair, but it is so much easier when curled. I like to curl in the direction of the final roll. Just roll the hair around your fingers and down the hair, then secure. Curl the rest of your hair all in the same direction and either leave the curls loose, or brush them through to create vintage waves.
You don’t need to be a dedicated vintage starlet or be wearing a swing skirt with a massive petticoat to wear this style. Rock this look with some high wasted jeans, Converse and a matching hair flower and you’ll ooze glamour and pin-up style.
Pop it all in a silk head scarf overnight and with a little smoothing, it will be ready for another day!
Modern Femme Fatale
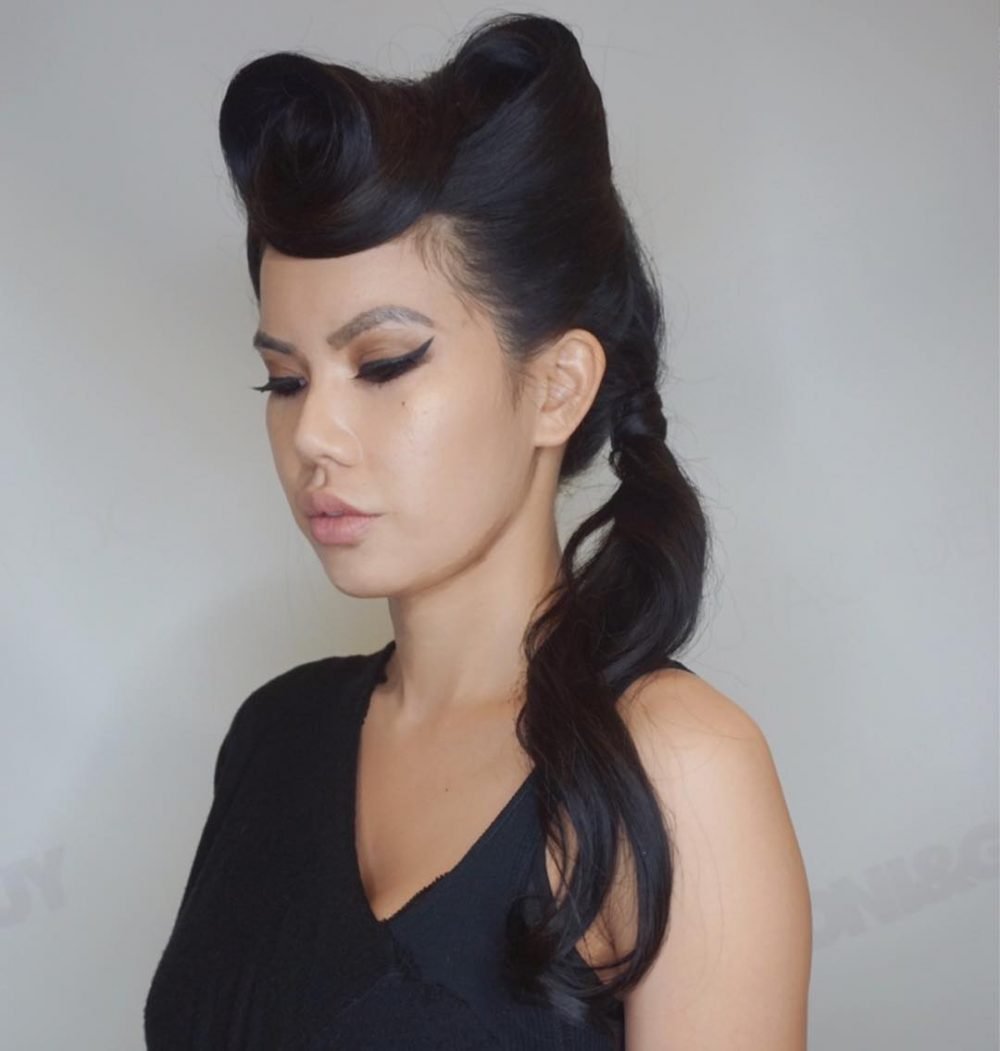
Q&A with style creator, Sass Moreno
Color Specialist @ TEK Salon & Spa in Costa Mesa, CA
How would you describe this look and what is your favorite thing about it?
The look that I created is more of a modern take on the victory roll with the roll placement, but it still maintains a classic feel with the silhouette. T
his was an amazing style that I really enjoyed creating. With the combination of smooth volume with the rolls paired with the low pony, the look creates interest from every angle.
What tips or products do you recommend to recreate this look?
When creatoing this look, make sure you are using the bobby pins correctly (ridges down on the scalp) because you should only need a few to secure this look. Make sure to hide them well! Clean sectioning will ensure a neat and polished style.
To achieve this look, I used a teasing brush, sectioning clips, a rattail comb, bobby pins, a 3/4-inch curling iron, S Factor Vivacious Hairspray, and S Factor Flat Iron Spray
What type of client would you recommend this look for?
The great thing about vintage hairstyles is that you can find one that suits each face shape and hair type, though most are easier to create with longer hair. As far as a daily style, these looks can seem a bit labor intensive, but the more you practice the easier it gets.
I recommend this look anyone who has a holiday or New Year’s Eve party. It really brings the drama, so dress accordingly my femme fatales!
Dry Finger Waves
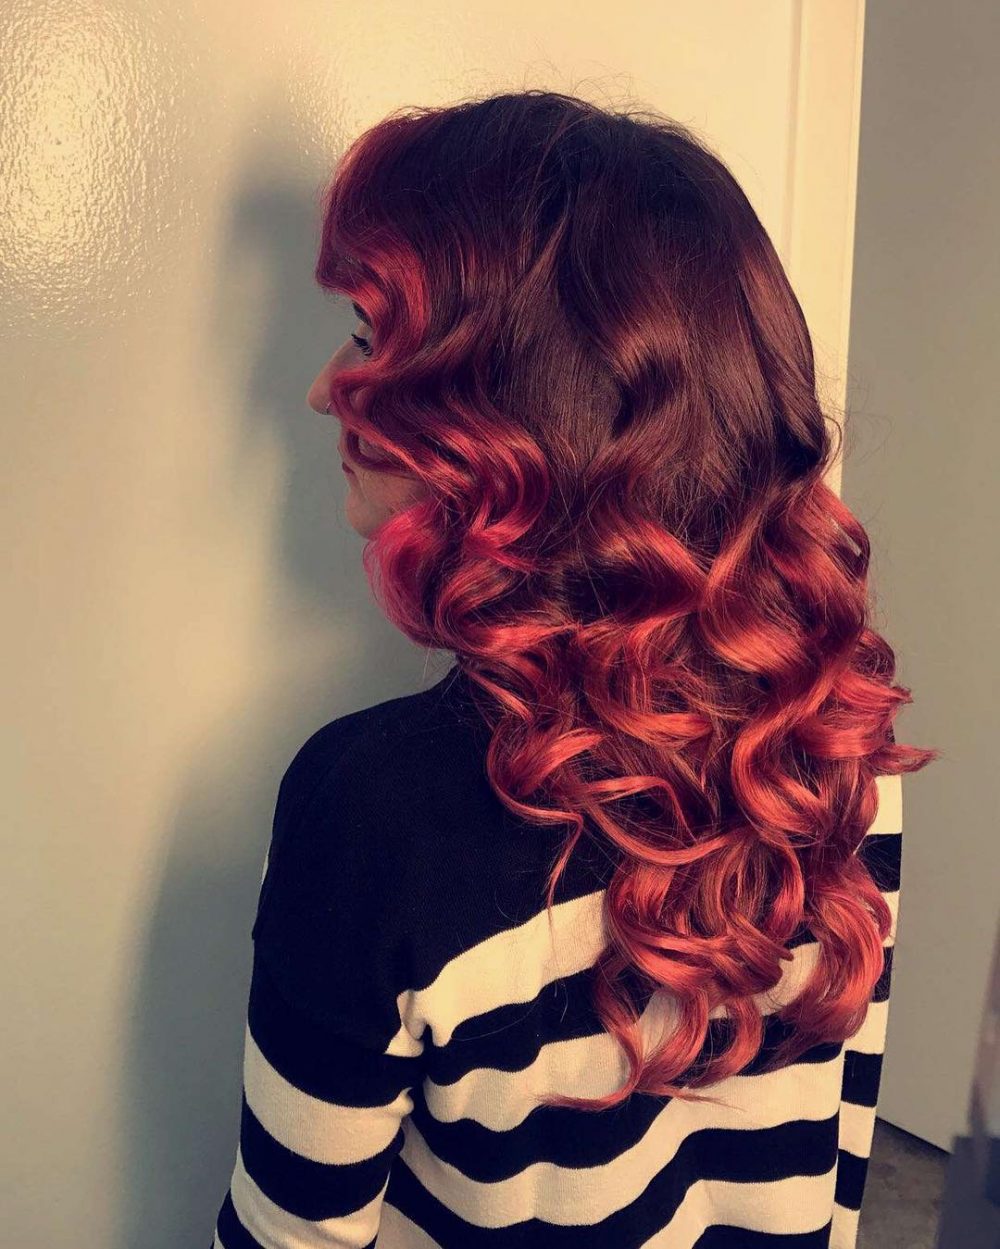
Q&A with style creator, Jessica Kaye
Hairstylist & Makeup Artist in Houston, TX
How would you describe this look and what is your favorite thing about it?
These are dry finger waves. This look has a very Old Hollywood/Veronica Lake/1940s style to it.
I love the dry finger waves that frame around the side of the face. It really brings out the eyes and lips for a very glamorous and alluring look.
What tips or products do you recommend to recreate this look?
Create a great foundation first. I used Aquage Uplifting Mousse, but gel spray at the root could also do the job. I then lightly misted the hair with a heat protectant (Aquage Beyond Body) that builds body and has a medium hold. I also like Sebastian’s Working Spray.
I used a 1 1/2-inch curling wand from Hot Tools to create the curls. From the top of the ears and up, my pin curls were pinned on base to cool. Halfway down, I did half on base and the rest off base pin curls. The trick is to start releasing the curls from the bottom up.
Use a detailing cream to smooth out any flyaways, then slowly pull apart the curl without disturbing the curl’s formation. To marry finger wave sections together, lightly put the sections together and tease gently so that you get a finger wave effect.
What type of client would you recommend this look for?
Long or medium length hair with longer layers looks best with this look. Short hair looks best set with wet finger waves.
All face shapes can wear this look with the front styled according to their face shape. Keep in mind that the goal with any haircut/hairstyle is too achieve a more oval shaped face.
This look can also be easily turned into any updo for a wedding or special occasion. The hairstyle is timeless!
Hidden Pin Curl Swirl
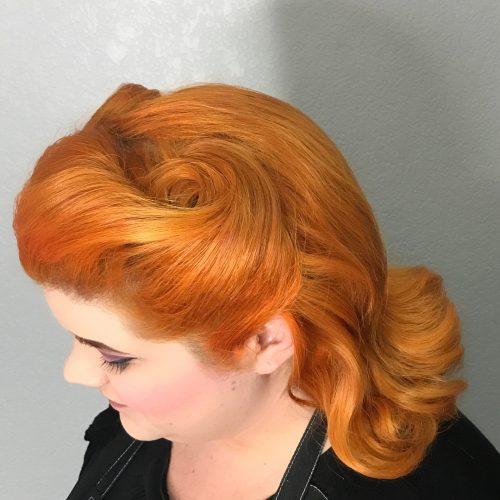
Q&A with style creator, Erika Alvarado
Master Stylist @ The List in Las Vegas, NV
How would you describe this look and what is your favorite thing about it?
I would describe it as a vintage-inspired look with a modern twist. My favorite thing about this style is that hidden pin curl swirl at the top of her head.
What tips or products do you recommend to recreate this look?
To recreate this look, I would use a thermal protectant to prep the hair (I used Fever by Beauty & Pinups). I set the hair with pin curl clips and used a 3/4-inch curling iron (I love Babyliss’ 3/4-inch Spring Curling Iron). In the back, I curled the sections going downwards in horizontal sections and parted her hair in a deep part.
On the side with the small victory roll, I curled the sections going upwards. On the other side with the most volume/hidden pin curl, the hair was curled going downwards in sections. After letting the curl set cool for 15 minutes, I brushed it out until I got the back to curl under and set it with R+Co’s Outerspace Flexible Hairspray.
For the front part of her hair, I teased it and molded one side into a small victory roll and pinned it in place. On the other side, I molded two barrel roles going back. They met in the middle to form the hidden pin curl swirl on top, and I pinned those in place as well.
Lastly, I smoothed the front with Suavecita Pomade and finished with R+Co’s Outerspace Flexible Hairspray. In short, curl the hair with a small curling iron ans set it using a heat protectant. Tease the front into two sections and mold one side into a victory roll facing forward, and the other side into a barrel role going back. Use a lightweight pomade or wax to smooth and a flexible hairspray to set.
What type of client would you recommend this look for?
This hairstyle is great for all hair types from fine to thick hair. Mid-length hair is best to recreate this look, but you could always create a similar version with shorter or longer hair.
This is a hairstyle for any woman who loves to try a style “outside the box” and someone who appreciates classic styles. This is a great look for all ages and for any occasion.
Classic Vintage Set
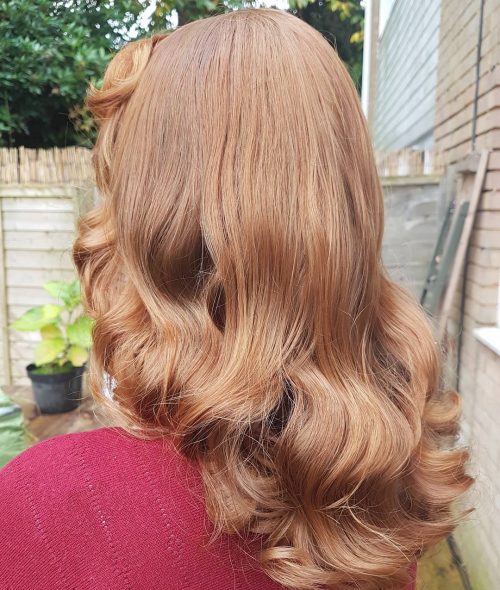
Q&A with style creator, Kayleigh Fuller
Freelance Hairstylist / Vintage Specialist in Southampton, UK
How would you describe this look and what is your favorite thing about it?
I’d describe this look as a classic vintage set and brush out. It’s a modern take on a vintage style curl as it’s more relaxed and less structured than it would have been originally.
I love this look because it suits everyone. It is glamorously soft and can be adapted for casual or formal occasions.
What tips or products do you recommend to recreate this look?
To get the best results from a set, great tools and products are a must. To create a strong curl, you need a small barrel tong. My favorite is from the Babyliss Pro Dial-a-Heat range. I just don’t think you can beat it. Everyone has their own favorite brushes, but I favor a Denman bristle brush or Spornette Wonder Brush and a comb to create this look.
To smooth away frizz and tame the curls into shape, Suavacita pomade is fantastic and smells amazing! To finish and keep everything in place, I recommend Kenra 25 Volume Hairspray. It’s windproof, humidity proof, and I’ve yet to find a product line that beats Kenra!
What type of client would you recommend this look for?
This look can be for everyone. It’s adaptable and can be more or less structured depending on the client’s style. Long, short, fine or thick hair can be set, it’s finding what works best for you.
To get the best shape, the cut is essential. This client had a modern middy-plus cut, which is a toned down version of the style popular with 40s and 50s Hollywood starlets. For ladies looking for a more authentic pin up style, this cut will improve your set in so many ways!
Because the final shape is all in the brushing out, there is a style that suits every face shape. It’s all about balance. To wear this style daily is fairly high maintenance and requires setting every couple of days for most, but get your set right and it can last for up to a week!
Unapologetically Girly
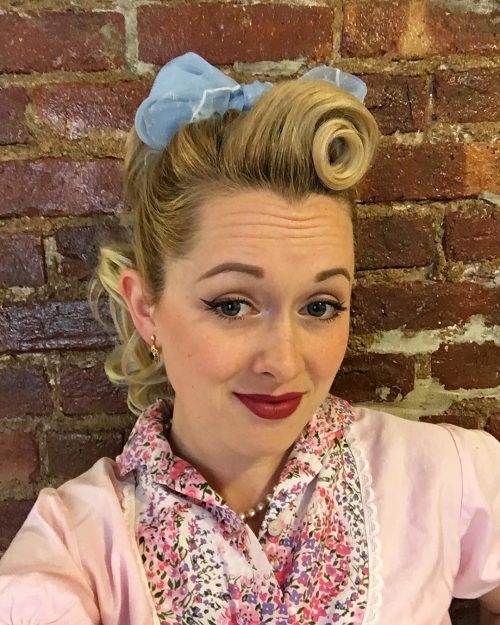
Q&A with style creator, Destinee Cushing
Vintage Hairstylist and Makeup Artist @ Vinspire in New York City, NY
How would you describe this look and what is your favorite thing about it?
This is a late 1940s look that has the beginning influences of the 1950s in it. My favorite part about the look is that I’m wearing trousers, a blouse and oxfords. This look would tend to be more masculine, but it’s actually feminine and unapologetically girly! The cotton candy colors, bow and big hair make it fun for me.
What tips or products do you recommend to recreate this look?
For the makeup, I put a warm eyeshadow color like a brown in my crease with cream colored shadow on the lid to make my eyes pop without stealing the show. I used a brown liquid liner for my cat eye. Black looks harsh on me, so I prefer the softness of a dark brown. A structured brow is important for pin up looks, so I used the Anastasia Beverly Hills brow pomade. Blush is important for pin up looks to make you look lively. I also softened the look by going with a nude/pink lip rather than the typical bright red hair color.
The hair actually has a big secret that I am happy to share with the world! I’m using a fake ponytail. I did this look in less than ten minutes and you can get this look even if you don’t have very much hair!
I curled just the front for the roll. I teased the three curls that I made with a 1-inch curling iron, smoothed them down with some Suavecita pomade, and pinned the roll in place. Then I hairsprayed it enough to make it stand up to anything.
After that, I swept the rest of my hair into a bun at the crown of my head. The ponytail comes curled and has little combs in it that can attach to the bun. You pin the combs in and tighten the drawstring on the ponytail. I then wrapped it around to give the illusion of an elastic holding the ponytail together. I pinned the ponytail in place all around the bun, then wrapped a vintage scarf around it and made a bow. I sprayed all over the hairstyle and around my hairline to sweep up any baby hairs, and voila!
What type of client would you recommend this look for?
Honestly, this look can work for anyone! Since I used a “fauxnytail”, the look will work for anyone who has long enough hair in the front for a roll (about chin-length at least) because it needs to be able to be pulled up into some sort of bun. It really should work with any face shape and be flattering because the placement of the ponytail adds volume which is complimentary to most faces.
This kind of look would be good for Halloween, a night out on the town, or anything really! Age also isn’t an issue here. I know women of all ages who dazzle in pin up-style looks all the time. I dress like this daily, so I believe that you never really need an excuse to dress up and look like the best version of yourself.
Poodle Do
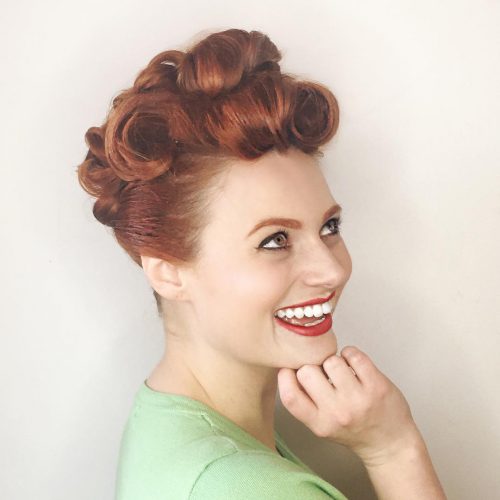
Q&A with style creator, Michael Davids
Hair & Makeup Artist @ Bouffant Delacroix in Toorak, VIC, Australia
How would you describe this look and what is your favorite thing about it?
The Poodle Do is the style in this photo. It was recreated by stylist Magic Michael Davids and made famous in the 1940s and 1950s on celebrities such as Lucille Ball and Betty Grable. Those were the decades of ultimate feminine style where ladies would go to the hair salon and get their hair set in curls and dressed out using skilled techniques that have nearly been lost today. The invention of the straightening iron may have contributed to this.
The Poodle Do is a tight and elegant hairstyle where the lady’s hair is first set in curls. The curling techniques vary as to whether you use traditional or modern techniques. Both achieve good results, but vary slightly in the finished result.
I would have to say my favorite aesthetic about this look is that it is unmistakably reminiscent of sophisticated glamour in the old world of stage and screen.
The hair is elegantly swept back up away from the face and nape of the lady’s neck, and the curls are elegantly dressed out on top of her head with meticulous precision. This style elevates the hair, elongating the profile and creating slender lines finished off with a dramatic burst of curls. Any diva sporting this style in the era of yesteryear would be destined to be swept off her feet by an admiring tall dark and handsome man. And of course they would live happily ever after.
What tips or products do you recommend to recreate this look?
The Poodle Do is a very versatile hairstyle to achieve as it can be created with most hair types and lengths, from just above the shoulders to hair that is midway down the back. It all depends on your ability to handle minimal hair (perhaps using a few hair extensions to pad the top out) or long hair (hiding excess hair by overlaying the hair as you wind it up into curls).
It is always good to start this style off by a classic pincurl set. This will set the hair in a curl formation that is essential for placing the style with ease. Without setting the hair in curls, you will risk having a frizzy messy style. I use a small hot curling iron and I allow the hair to cool in pin curl clips.
The products I like to use are by White Sands. They have an amazing heat setting pump spray (which we apply to each section before curling with the irons) and aerosol finishing spray (used to set the finished style in place”. Their products are incredible as they can hold curl in even the most fine slippery hair. White Sands products are not sticky, they do not flake, and they can easily be brushed out and restyled with ease. Their price point is on the higher end of the scale, however we all know the rule about cheap vs expensive when it comes to cosmetic products.
Sectioning is also very important with this hairstyle. After the hair is curled, be sure to section off the top of the hair in a horseshoe shape from temple to temple, scooping around the back to just underneath the crown.
Using spray and a bristle brush, comb the underneath of the hair upwards in sections and pin it tightly up into the base of the top section. Grab small sections on top of the head, teasing the base and creating barrel curls by wrapping the hair around your fingers. Secure each curl with bobby pins. Refine the style by dressing each curl out so they work in harmony with each other. It is important to make sure the style is symmetrical unless you purposely want a feature piece framing one side of the face. Once you are happy, fix the style with strong hold hairspray.
What type of client would you recommend this look for?
This style is suitable for a niche clientele, however it is always a good style to have tucked away in your styling repertoire.
The clients you would most likely come across for this style are vintage enthusiasts, pin up pageant girls and burlesque artists, as well as people going to costume parties. There are also always drag queens and the secret “I Love Lucy”-obsessed people from that era who are holding onto nostalgia. Either way, this style is great fun to create and will come in handy when you least expect it, or when you want to embrace your inner silver screen goddess.
#1 Crimped Upside Down Braid
Written by Shannel Mariano
The crimped texture on the hair gives this pin up-inspired upstyle more interest.
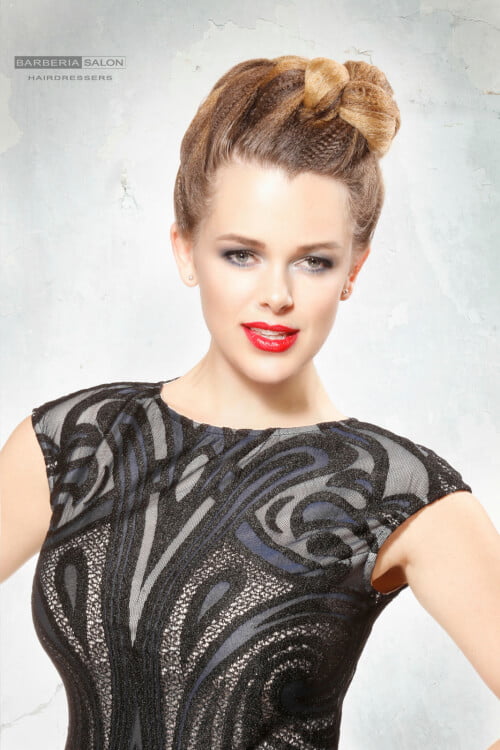 Credit: Barberia Salon Hairdressers
 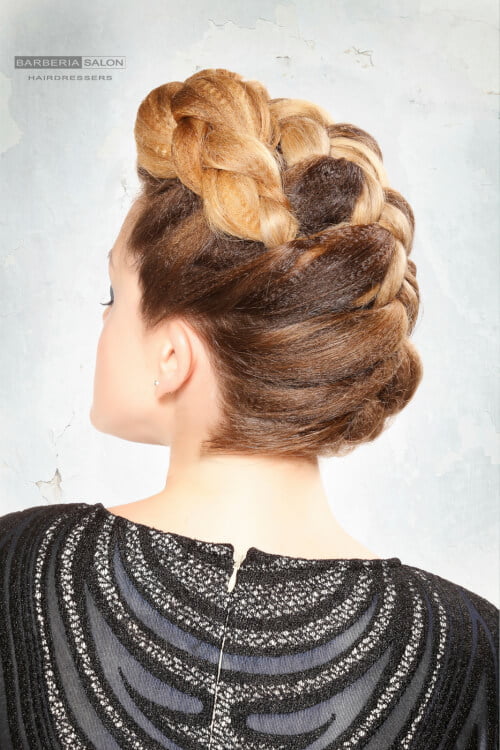 Credit: Barberia Salon Hairdressers
How To Style:
- Apply thermal protection to dry hair.
- Crimp the hair using a crimper.
- With your head upside down, French braid your hair starting from the bottom, working your way upwards towards one side on the of the top of your head.
- From there, continue French braiding to the side.
- Once your run out of hair to pick up to add to the French braid, continue braiding backwards and secure with an elastic band.
- Tuck the braid not attached to the scalp into hair in the back.
- Secure with a bobby pin.
- Set with a finishing spray.
Recommended Products:
Perfect Iron Spray protects hair from thermal irons up to 450 F.
Best Face Shape and Hair Type:
Wider face shapes with hair that is medium in texture and high in density will suit this style best.
#2 Pomped Braid
Written by Shannel Mariano
This combination of color, curls and braids gives this upstyle so much texture. The front has some height, giving the illusion of length for the face.
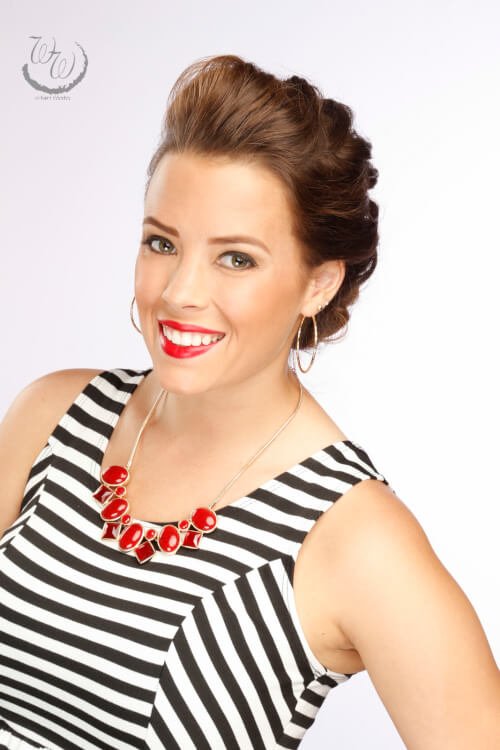 Hair Cindy Hemslee, Makeup Clandia Alvarado for William Wesley Grand Salon and Spa, Davenport, IA
 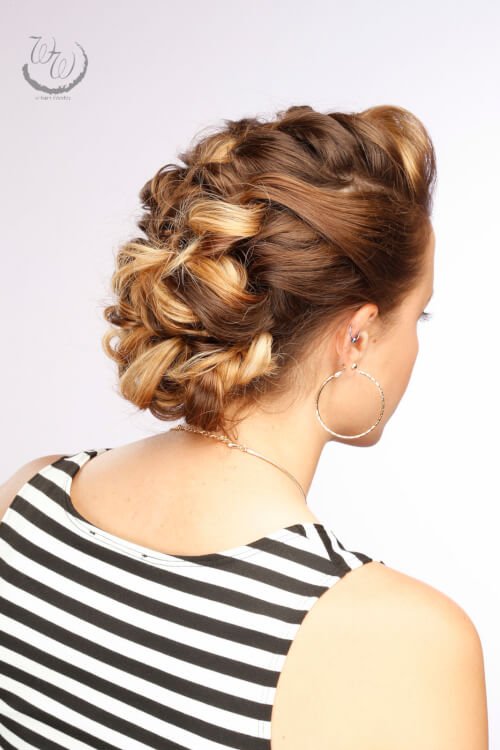 Hair Cindy Hemslee, Makeup Clandia Alvarado for William Wesley Grand Salon and Spa, Davenport, IA
How To Style:
- Give the hair some texture and grit using styling products on dry hair.
- Lightly tease a triangle section of the front and set it with hairspray.
- Gently and carefully begin to French braid the hair on top, including the hair that was teased. Do not include hair on the sides of the head, just the Mohawk section all the way to the back.
- Secure the braid with an elastic band.
- Pin up the braid using a bobby pin.
- Curl the hair on the sides.
- Gently and loosely pull them back and pin them into the braid.
- Set with a finishing spray.
Recommended Products:
Caviar Perfect Texture Spray gives the hair a great foundation for upstyles.
Best Face Shape and Hair Type:
Wider face shapes with hair that is medium in texture and high in density will suit this hairstyle best.
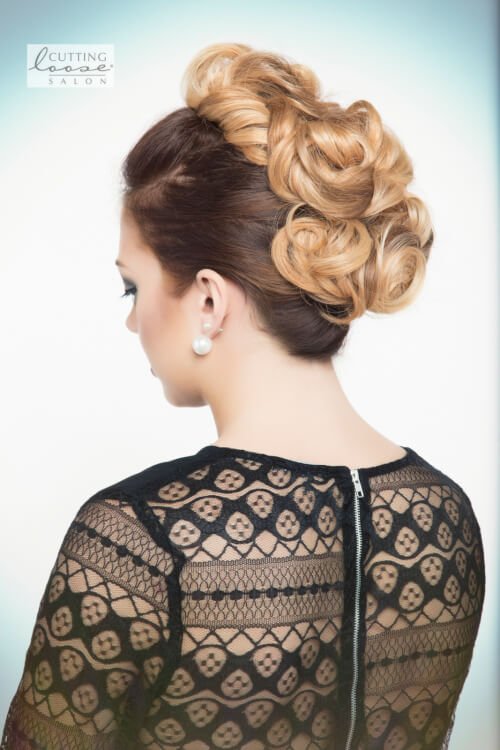
#3 Mohawk Curls
Written by Shannel Mariano
This easy-to-recreate upstyle is basically just three ponytails lined up vertically and curled into a Mohawk!
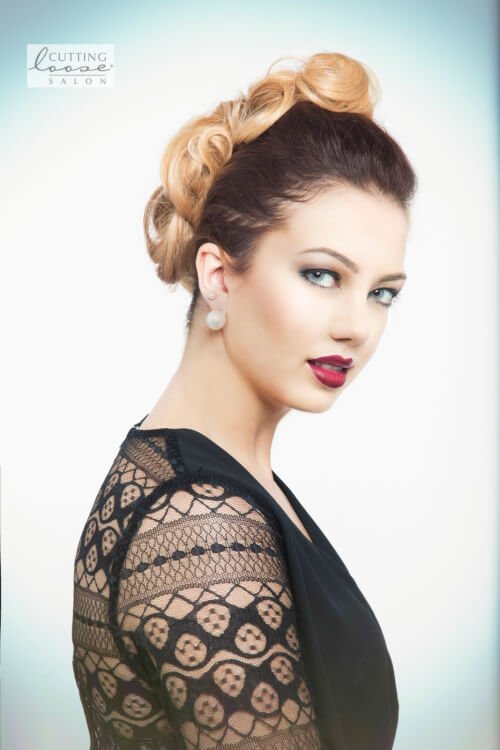 Credit: Cutting Loose Salon
  Credit: Cutting Loose Salon
How To Style:
- Apply a product for texture and grit on dry hair.
- Create three ponytails lined up vertically on the Mohawk section of the head.
- Curl the ponytails.
- Pin them in place using bobby pins.
- Apply a product for shine.
Recommended Products:
Alterna’s Bamboo Kendi Dry Oil Micromist Spray gives the hair shine without affecting the hold of hairspray on hair.
Best Face Shape and Hair Type:
Wider face shapes with hair that is medium in texture and high in density will suit this hairstyle best.
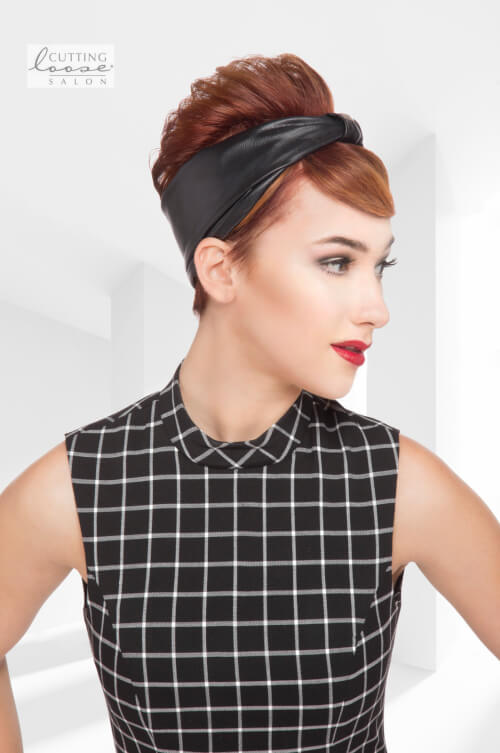
#4 Band Illusion
Written by Shannel Mariano
This vintage-inspired hairstyle is a great way to dress up shorter hair. The crown is teased up high and a hairband is worn around the head, keeping the shorter pieces tucked and giving the profile a great shape.
 Credit: Cutting Loose Salon
  Credit: Cutting Loose Salon
How To Style:
- Tease sections of hair on the crown area and set it with hairspray.
- Carefully put a headband around the hair.
Recommended Products:
Caviar Anti-Aging Extra Hold Hairspray gives the hair ultra-firm control while protecting the style from humidity.
Best Face Shape and Hair Type:
Wider face shapes with hair that is medium in texture and density will suit this hairstyle best.
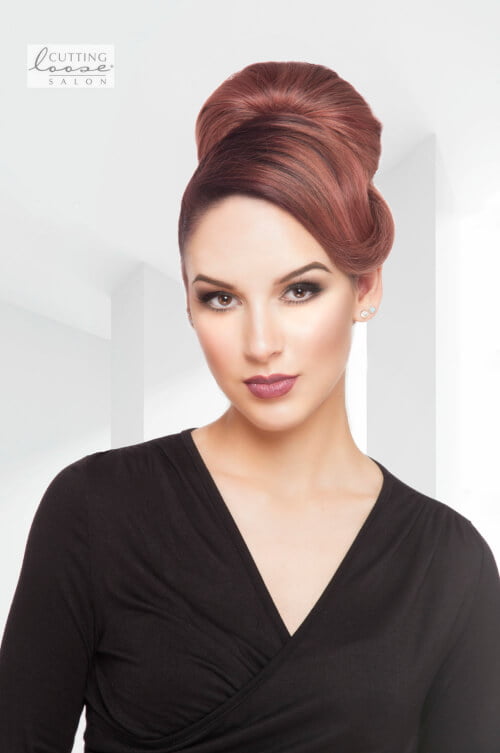
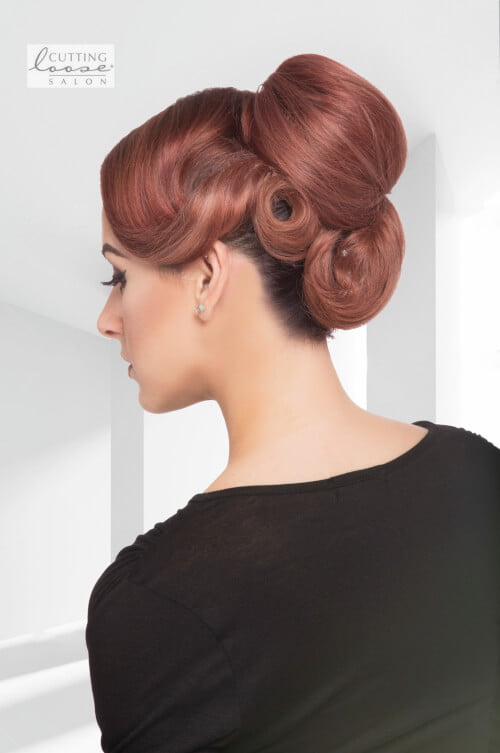
#5 Buns and Pin Curls
Written by Shannel Mariano
This sleek upstyle consists of a high bun and a very clean, beautiful detail of hair sweeping away from the face.
 Credit: Cutting Loose Salon
How To Style:
- Create a deep side parting.
- Section out the hair on top of the head from the parting to the parietal ridge on the other side.
- Gather all the other hair into a high ponytail and secure with an elastic band.
- Lift and lay the ponytail over the top of the head.
- Pin hair padding over the ponytail above the base of the ponytail.
- Let the ponytail fall over the hair padding and completely cover it.
- Put an elastic on the ponytail right underneath the padding to secure the hair over the padding.
- Lightly and gently tuck the elastic slightly underneath the padding to cover it and pin it in place with a bobby pin.
- Shape the remaining hair from the ponytail into different pin curls on one side of the head and secure them with bobby pins.
- Release the hair that was sectioned out on top of the head.
- Sweep the hair backwards and create pin curls with them, placing them towards the other pin curls created from the ponytail.
- Set the hairstyle with hairspray.
- Apply a shine spray to the hair.
Recommended Products:
Alterna’s Bamboo Kendi Dry Oil Micromist gives the hair shine without breaking down hairspray on the hair.
Best Face Shape and Hair Type:
Wider face shapes with hair that is medium in density and texture will suit this hairstyle best.
Tip:
You can buy hair padding from any beauty supply or online.
#6 Old Hollywood Waves
Written by Shannel Mariano
These beautiful waves are classic and definitely never go out of style.
 Credit: Cutting Loose Salon
How To Style:
- Create a deep side parting.
- Apply thermal protection to dry hair.
- Curl sections and curl them as uniformly as possible. Make sure they are the same size sections and curled all the same direction.
- Once you have curled all sections of hair and they have all cooled, use a dressing brush to brush through the curls until they form into a wave.
- To make the ridges more prominent, lightly tease once underneath each one.
- Once you are happy with the shape, set the style with some finishing spray.
Recommended Products:
Caviar Perfect Iron Spray protects hair from the heat of the iron up to 450 F.
Best Face Shape and Hair Type:
All face shapes with hair that is medium in texture and density will suit this hairstyle best.
#7 THIS ABOVE ALL
Written by Tanya Ramirez
Victory rolls are a quintessential aspect of vintage hairstyles. Polished perfection!
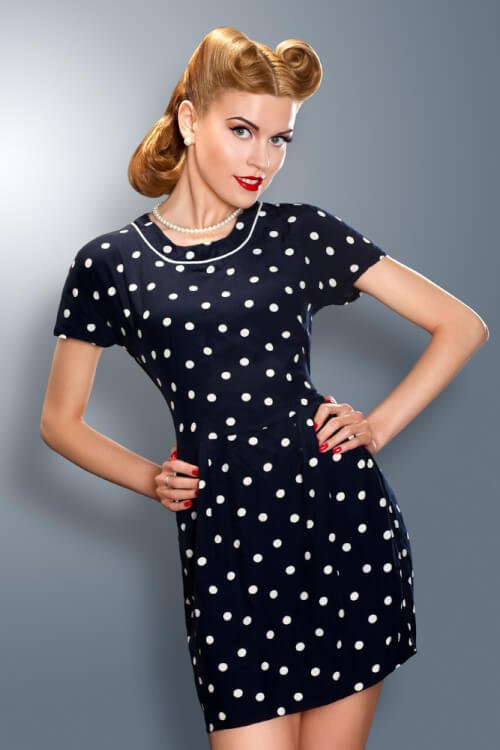
How To Style:
- Prep clean, dry hair with a light hold working hairspray.
- Create a severe center part, then divide hair into three sections: right, left and back.
- Begin on the right side and brush the area smooth. Use a light hold gel or light spray wax for control and to tame any flyaways. Take the ends and begin rolling upward towards the head in a smooth and controlled motion. Use a hair donut, padding or gentle backcombing for extra support. Pin as needed with bobby pins.
- Repeat the steps noted above on the left side. Be sure your rolls are symmetrical. Smooth the exterior of both rolls with a fine tooth comb and light hairspray.
- Next, brush hair smooth in the back area. Backcomb the base interior of the hair from the nape downward. Gather ends then tuck and roll under and upwards towards the nape to create your style. Secure at the base of the neck using bobby pins.
- Finish with a hard-hold/high shine hairspray.
Recommended Products:
Try TIGI Bed Head HARD HEAD Hairspray for superior hold and high shine.
Best Face Shape and Hair Type:
This look is suitable for oval, square and round face shapes. This style works best on medium to thick hair.
Tip:
Accent with Kevin Murphy’s COLOR.BUG for that extra glow!
#8 THE WATCH(WO)MEN
Written by Tanya Ramirez
Get inspired by this delightful ‘do, reminiscent of super-heroine Silk Spectre aka (Sally Jupiter).
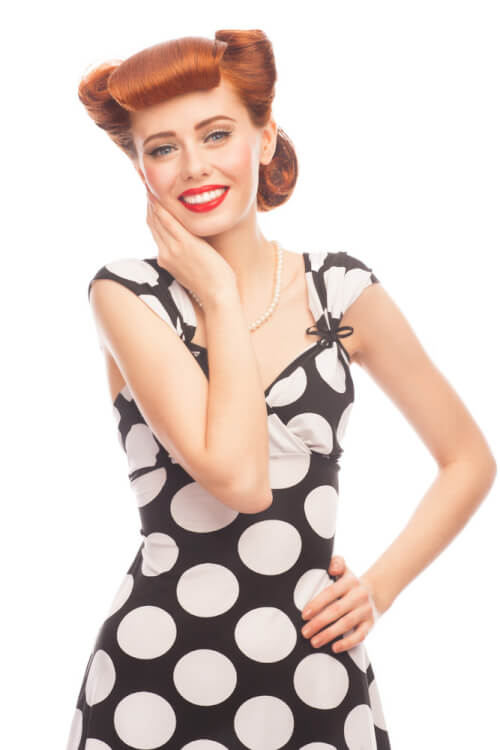
How To Style:
- Prep clean, dry hair with a light hold working hairspray.
- Begin with the fringe area. Create a horizontal parting and brush hair forward. Backcomb the underside interior of the hair. Gather ends and roll under to create your fringe roll. Use a hair donut, padding or gentle backcombing for extra support. Pin under as needed with bobby pins. Smooth the exterior of the fringe with a fine tooth comb and light hairspray.
- Now, divide hair into three remaining sections: right, left and back area.
- Begin on the right side and brush the area smooth. Use a light hold gel or light spray wax for control and to tame any flyaways. Take the ends and begin rolling upward toward the head in a smooth and controlled motion. Use a hair donut, padding or gentle backcombing for extra support. Pin as needed with bobby pins.
- Repeat the steps noted above on the left side. Be sure your rolls are symmetrical. Smooth the exterior of both rolls with a fine tooth comb and light hairspray.
- Next, brush hair smooth in the back area. Backcomb the base interior of the hair from the nape downward. Gather ends then tuck and roll under and upwards toward the nape to create your style. Secure at the base of the neck using bobby pins.
- Finish with a hard-hold/high shine hairspray.
Recommended Products:
Try Kevin Murphy SESSION.SPRAY for flexible hold with anti-humidity protection.
Best Face Shape and Hair Type:
This look is suitable for oval, round and square face shapes. This style works best on medium to thick hair.
Tip:
Add a bejeweled barrette to accent your look.
#9 A STAR IS BORN
Written by Tanya Ramirez
A little goes a long way with pin up hairstyles. Keep hair soft and simple and enhance your look with dramatic makeup.
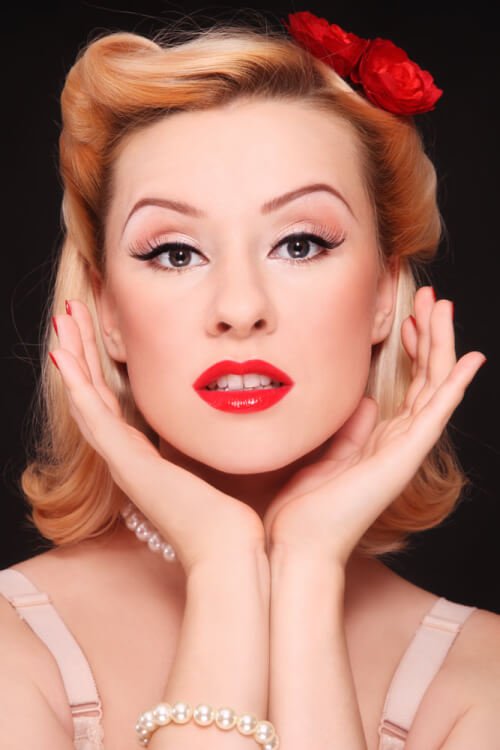
How To Style:
- Prep damp hair with a light hold volumizing mousse.
- Blow dry with a paddle brush or a round brush for extra volume. Flip hair ends up and out as your dry.
- Create a soft side parting. Take the left side and style up and away from the face. Twist gently to create a bit of volume. Secure with a bobby pin.
- Next, take the fringe and the right side and sweep up and away from the face. Twist gently for extra volume then secure with a bobby pin.
- Smooth any stray hairs and the hairline.
- Finish with a light hold hairspray.
Recommended Products:
Try Kevin Murphy BODY.BUILDER Volumizing Mousse for flexible fullness and hold.
Best Face Shape and Hair Type:
This look is suitable for round, square or oval shaped faces. This style works best on fine to medium hair.
Tip:
Accent your style with a small flowers.
#10 TO CATCH A THIEF
Written by Tanya Ramirez
Ring in the summer season wearing this eye-popping look with a hint of mystery.
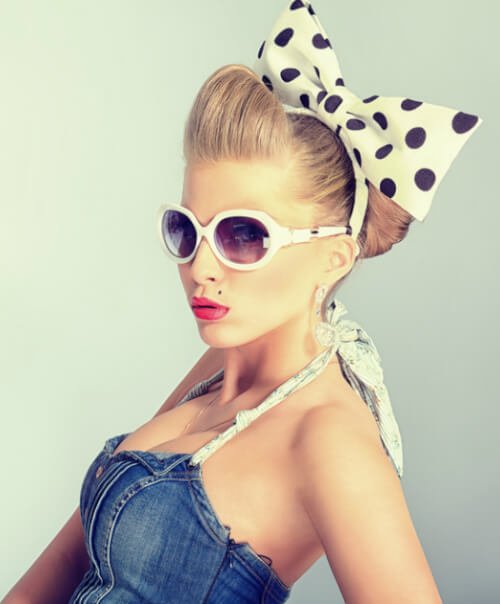
How To Style:
- Prep clean, dry hair with a light hold working hairspray.
- Take the fringe section and create a slight pompadour. Twist and secure with a bobby pin.
- Brush remaining hair smooth and gather into a ponytail. Backcomb the underside interior of hair and roll the ends under and in an upward motion to create a bun. Pin hair at the base of the bun and along the sides as needed.
- Finish with a light hold hairspray.
Recommended Products:
Try Kevin Murphy ANTI-GRAVITY volumizer and texturizer for control with oil-free shine.
Best Face Shape and Hair Type:
This look is suitable for oval, square or heart shaped faces. This style works best on medium hair.
Tip:
Accent this look with an oversized hair bow.
#11 LOVE AFFAIR
Written by Tanya Ramirez
Soft, romantic hair is timeless. Update your look with soft, face-framing tendrils.
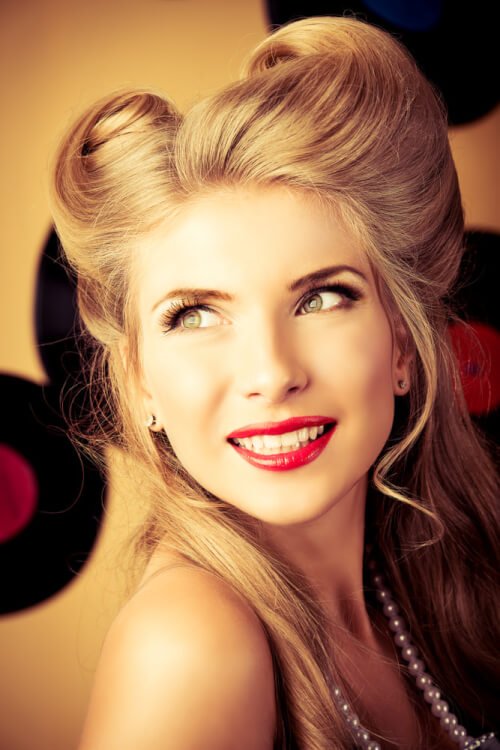
How To Style:
- Prep clean, dry hair with a light hold working hairspray.
- Create a clean side parting then divide hair into three sections: right, left and back areas.
- Begin on the right side and brush the area smooth. Use a flexible hairspray for control and to tame any flyaways. Take the ends and begin rolling upward toward the head in a smooth and controlled motion. Use a hair donut, padding or gentle backcombing for extra support. Pin as needed with bobby pins. Keep the finish soft and romantic.
- Repeat the steps noted above on the left side, incorporating the fringe as well. Be sure your rolls are neat and soft. Smooth the exterior of both rolls with your fingers and light hairspray.
- Next, brush hair smooth in the back area. Create soft spiral curls with a large barrel iron. Curl hair from the ends up through the mid length of the hair in a vertical fashion. Release curls and allow to fall softly.
- Pull a few soft tendrils to frame the face. Curl as needed.
- Finish with a light hold hairspray.
Recommended Products:
Try Kevin Murphy FRESH.HAIR for perfect next-day hair.
Best Face Shape and Hair Type:
This look is suitable for round, oval or square shaped faces. This style works best on medium to thick hair.
Tip:
Define your face-framing tendrils with a light hold wax.
#12 THE FARMER’S DAUGHTER
Written by Tanya Ramirez
This sweet curly ‘do is innocence and class rolled into one.
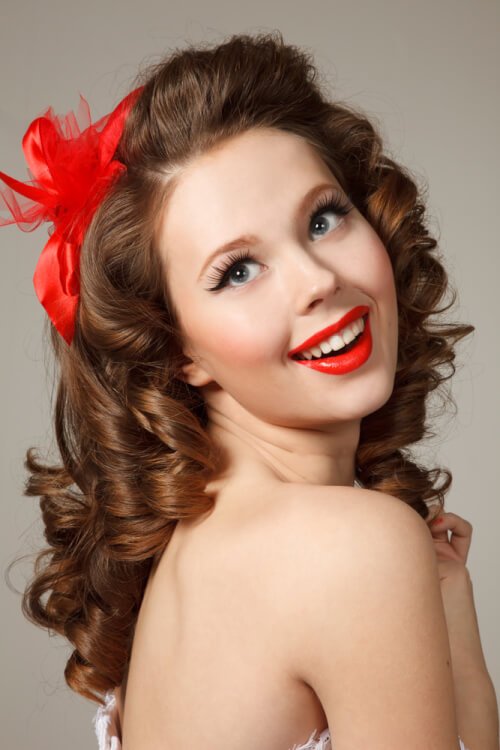
How To Style:
- Prep clean, dry hair with a light hold working hairspray.
- Create a clean side parting then divide hair into three sections: right, left and back.
- Begin on the right side by taking 1-inch vertical sections and curl hair using a large barrel curling iron to create large spiral curls.
- Repeat the steps noted above on the left side, incorporating the fringe as well. Backcomb the fringe lightly and brush up and away from face then spiral curl hair in a vertical fashion.
- Next, brush hair smooth in the back area. Create soft spiral curls with a large barrel iron. Curl hair from the ends up through the mid length of the hair in a vertical fashion. Release curls and allow to fall softly.
- Finish with a light hold hairspray.
Recommended Products:
Try Oribe Apres Beach for touchable waves with beautiful shine.
Best Face Shape and Hair Type:
This look is suitable for square, oval or round shaped faces. This style works best on medium to thick hair.
Tip:
Accent with a gorgeous red bow.
#13 A FREE SOUL
Written by Tanya Ramirez
These are perfect curls for a trip to the soda fountain on a Saturday night. Super sweet!
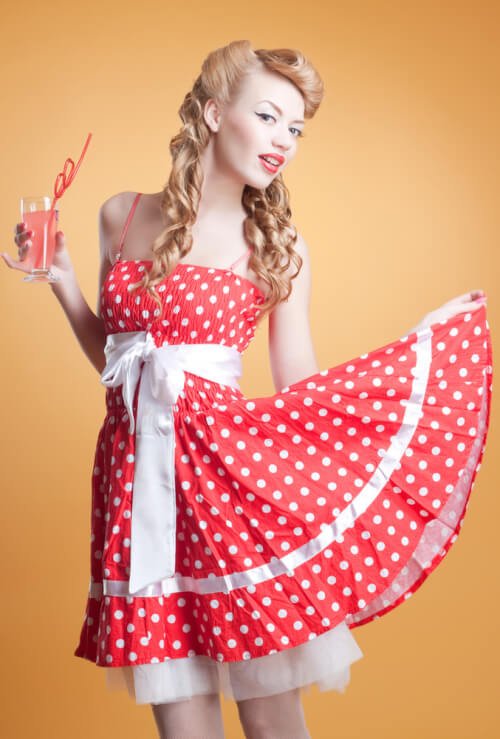
How To Style:
- Prep clean, dry hair with a light hold working hairspray.
- Create a clean side parting then divide hair into three sections: right, left and back.
- Begin with the fringe area. Create a horizontal parting and brush hair forward. Backcomb the base of the section. Sweep hair back and away from face to create a soft fringe roll. Use a hair donut, padding or gentle backcombing for extra support. Pin under as needed with bobby pins. Smooth the exterior of the fringe with a fine tooth comb and light hairspray.
- Next, move the right side and brush the area smooth. Use a flexible hairspray for control and to tame any flyaways. Take the ends and begin rolling upward toward the head in a smooth and controlled motion. Use a hair donut, padding or gentle backcombing for extra support. Pin as needed with bobby pins.
- Repeat the steps noted above on the left side. Be sure your rolls are neat and soft. Smooth the exterior of both rolls with your fingers and light hairspray.
- Next, brush hair smooth in the back area. Create soft yet defined spiral curls with a large barrel iron. Curl hair from the mid length through to the ends in a vertical fashion. Release curls and allow to fall softly.
- Finish with a light hold hairspray.
Recommended Products:
Try Kevin Murphy YOUNG.AGAIN treatment oil for smooth, shiny hair.
Best Face Shape and Hair Type:
This look is suitable for oval, square and round face shapes. This style works best on medium hair to thick hair.
Tip:
Accent with a delicate hair ribbon.
#14 FOLLOW THE FLEET
Written by Tanya Ramirez
Amp up that bob with this softly curled pin up hairstyle that’s guaranteed to keep those heads turning.
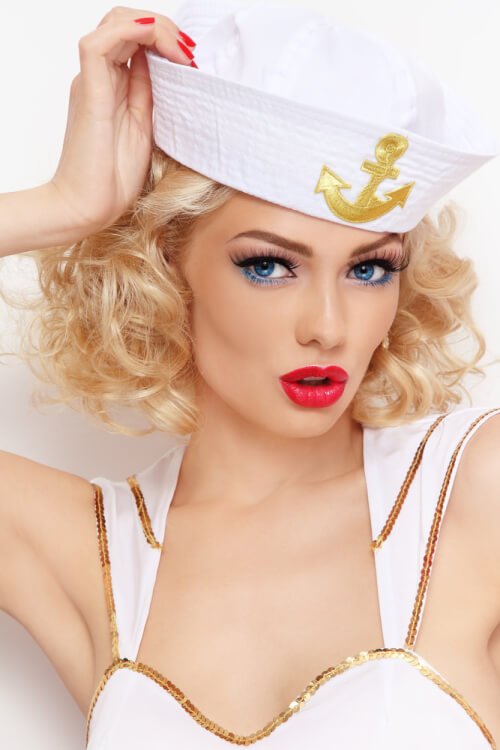
How To Style:
- Prep clean, dry hair with a light hold working hairspray.
- Create a soft side parting then divide hair into three sections: right, left and back area.
- Begin on the right side and brush the area smooth. Use a medium barrel curling iron to create soft spiral curls from roots to ends
- Repeat the steps noted above on the left side. Use a medium barrel curling iron to create soft spiral curls from roots to ends
- Next, brush hair smooth in the back area. Use a medium barrel curling iron to create soft spiral curls from roots to ends.
- Deconstruct curls gently using your fingertips. Backcomb gently for extra fullness.
- Finish with a light hold hairspray.
Recommended Products:
Try DermOrganic Windswept DEFINING WHIP for separation and definition with bounce and movement.
Best Face Shape and Hair Type:
This look is suitable for round, oval or heart shaped faces. This style works best on medium to fine hair.
Tip:
Brush curls smooth for a soft, finger-waved look.
#15 COQUETTE
Written by Tanya Ramirez
A gorgeous silhouette is certain to be admired. Give your hair a high gloss kick for that extra vintage vibe.
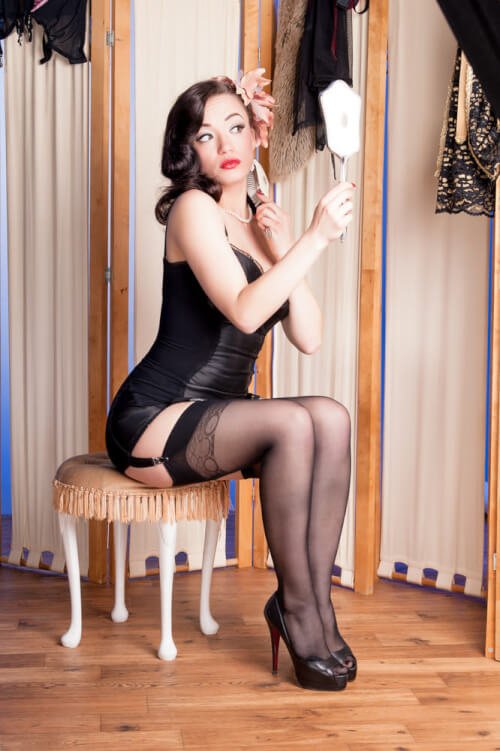
How To Style:
- Prep damp hair with a light hold volumizing mousse.
- Blow dry with a paddle brush or a round brush for extra volume.
- Create a soft side parting. Take large one to two inch sections and curl hair horizontally using a large barrel curling iron. Secure curls with a pin curl clip and allow to cool.
- Continue until all hair is curled. Allow hair to cool for 10 minutes. Release pin curl clips and allow curls to fall. Brush hair smooth using a paddle brush to create soft, glamorous Hollywood waves.
- Finish with a light hold hairspray.
Recommended Products:
Try Kevin Murphy STAYING ALIVE Leave-in Conditioner for added protection and flexibility.
Best Face Shape and Hair Type:
This look is suitable for most face shapes. This style works best on medium to thick hair.
Tip:
Gather ends into a chignon for an upswept style.
#16 PILLOW TALK
Written by Tanya Ramirez
Be ready for that important call with this look that easily transforms from day to night.
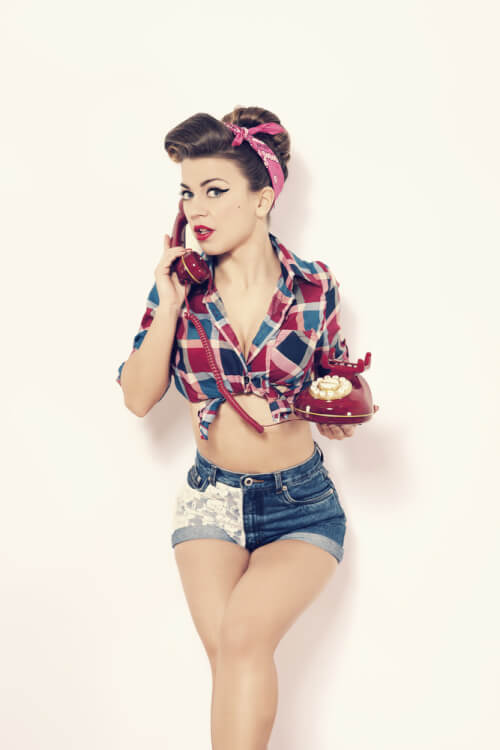
How To Style:
- Prep clean, dry hair with a light hold working hairspray.
- Take the fringe section and curl hair horizontally using a large barrel curling iron. Backcomb the underside, then take the ends and roll under to create your fringe roll.
- Next, brush remaining hair smooth and gather into a high ponytail. Depending on the thickness of your hair, you can use a hair donut to create a bun. If you have thick hair, take your ponytail and twist it lengthwise, then wrap it around to create a bun. Pin hair at the base of the bun and along the sides as needed.
- Finish with a light hold hairspray.
Recommended Products:
Try Kevin Murphy BODY.GUARD leave-in creme to smooth and protect hair with extra shine.
Best Face Shape and Hair Type:
This look is suitable for square, oval or heart shaped faces. This style works best on medium to thick hair.
Tip:
Accent with a cute bandana for a casual look.
#17 GENTLEMEN PREFER BLONDES
Written by Tanya Ramirez
Baby blonde waves don’t lie. This look will have you taking numbers!
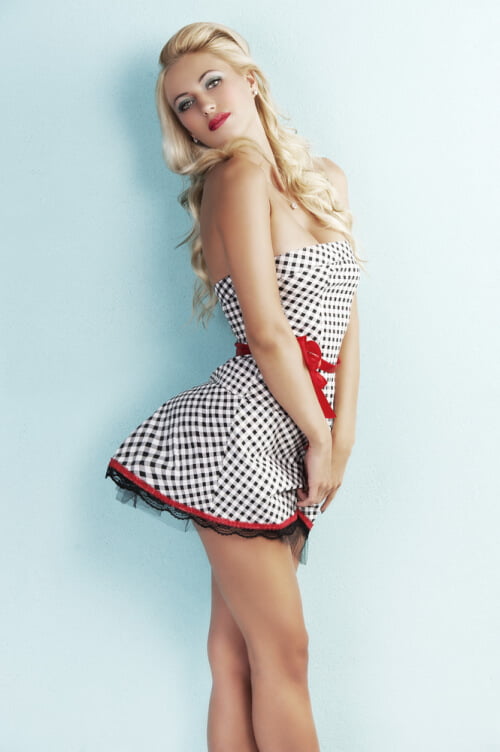
How To Style:
- Prep damp hair with a light hold volumizing mousse.
- Blow dry with a paddle brush or a round brush for extra volume.
- Create a soft side parting. Take large one to two inch sections and curl hair by wrapping around a large barrel curling iron from mid-length to ends.
- Continue until all hair is curled. Backcomb fringe slightly and style up and away from face.
- Finish with a light hold hairspray.
Recommended Products:
Try Kevin Murphy ANTI-GRAVITY volumizer and texturizer for control with oil-free shine.
Best Face Shape and Hair Type:
This look is suitable for most face shapes. This style works best on fine to medium hair.
Tip:
Accent this look with a small hair bow.
#18 COVER GIRL
Written by Tanya Ramirez
The spotlight will be on you with this voluminous pin-curled style.
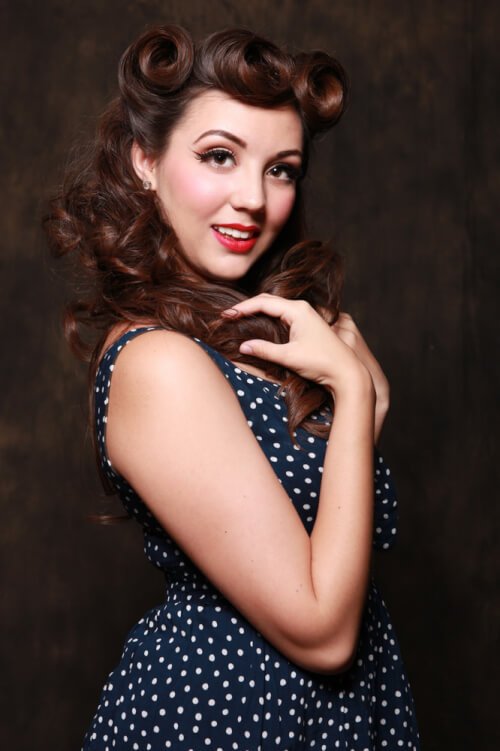
How To Style:
- Prep clean, dry hair with a light hold working hairspray.
- Begin with the fringe area. Create a horizontal parting beginning at the crown and brush hair forward. Gather ends and roll to create your pin curled fringe roll. Pin under as needed with bobby pins.
- Then divide hair into three remaining sections: right, left and back areas.
- Begin on the right side and brush the area smooth. Use a light hold gel or light spray wax for control and to tame any flyaways. Take the ends and begin rolling hair upward toward the head in a smooth and controlled motion for a smooth ‘C’ shaped curl.
- Repeat the steps noted above on the left side. Be sure your rolls are symmetrical. Smooth the exterior of both rolls with a fine tooth comb and light hairspray.
- Next, brush hair smooth in the back area. Create soft curls with a medium barrel iron. Curl hair from the mid-length through to ends in a vertical fashion. Release curls and allow to fall softly. Backcomb gently for a soft, voluminous finish.
- Finish with a light hold hairspray.
Recommended Products:
Try Kevin Murphy FULL.AGAIN thickening lotion for fullness and body with natural movement.
Best Face Shape and Hair Type:
This look is suitable for oval, round or square shaped faces. This style works best on medium to thick hair.
Tip:
Accent this look with a delicate silk scarf.
#19 SPITFIRE WOMAN
Written by Tanya Ramirez
This is a clean, simple and easy pin up-inspired style. Sometimes that’s all it takes to get noticed!
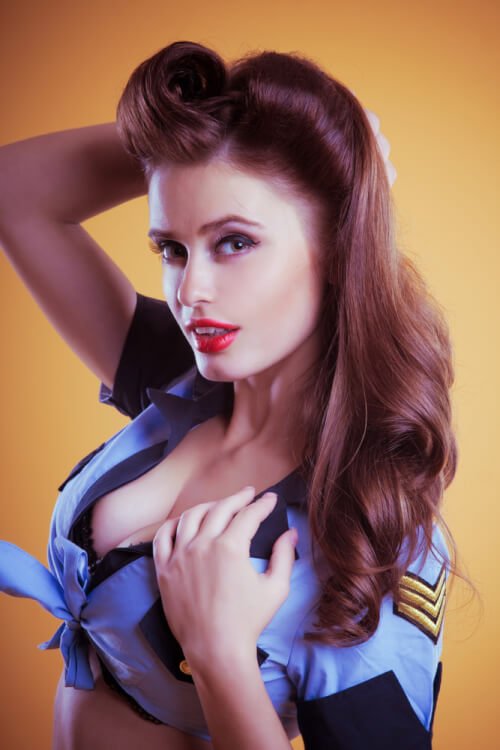
How To Style:
- Prep clean, dry hair with a light hold working hairspray.
- Create a slight side parting and take the fringe area comb forward. Backcomb the surface lightly then roll hair back and away from face then secure with a bobby pin.
- Then divide hair into three sections: right, left and back areas.
- Begin on the right side and brush the area smooth. Use a flexible hairspray for control and to tame any flyaways. Take the ends and begin rolling upward toward the head in a smooth and controlled motion. Use a hair donut, padding or gentle backcombing for extra support. Pin as needed with bobby pins. Keep the finish soft.
- Repeat the steps noted above on the left side, incorporating the fringe as well. Be sure your rolls are neat and soft. Smooth the exterior of both rolls with your fingers and light hairspray.
- Next, brush hair smooth in the back area. Backcomb the interior for volume and smooth the surface area. Create soft spiral curls on the ends only with a large barrel iron. Release curls and allow to fall softly.
- Finish with a light hold hairspray.
Recommended Products:
Try Kevin Murphy STAYING ALIVE Leave-in Conditioner for added protection and flexibility.
Best Face Shape and Hair Type:
This look is suitable for oval, square and round face shapes. This style works best on medium to thick hair.
Tip:
Gather hair up into a high ponytail for a different look on day two.
#20 AIR HOSTESS
Written by Tanya Ramirez
Take things to a new level with this fun and sassy, 1940’s inspired hairdo.
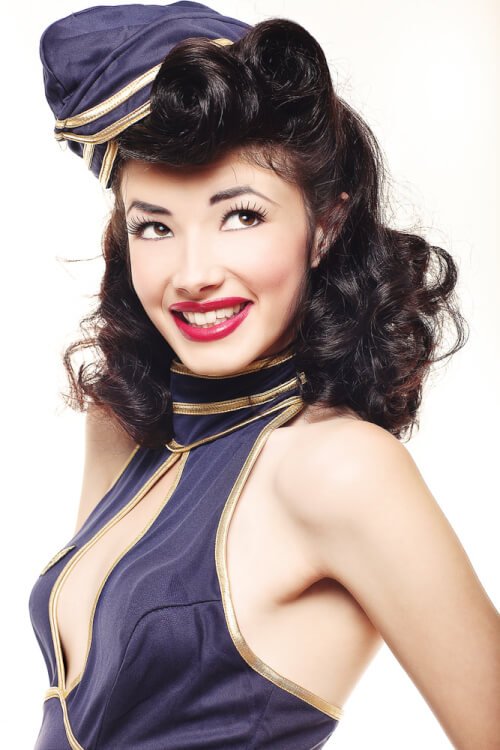
How To Style:
- Prep clean, dry hair with a light hold working hairspray.
- Begin with the fringe area. Divide the fringe into two sections. Create a horizontal parting beginning at the crown and brush hair forward. Backcomb gently then gather ends and roll to create your stand-up pin curled fringe roll. Take the next fringe section and roll hair to create another stand-up pin curl roll. Secure as needed with bobby pins.
- Next, brush hair smooth in the back area. Backcomb the interior for extra volume and keep the surface smooth. Create soft curls with a medium barrel iron. Curl hair from the mid-length through to ends in a horizontal fashion. Set curls using pin curl clips until all hair is curled. Allow hair to cool, then release curls and allow to fall softly. Backcomb gently for a soft, voluminous finish.
- Finish with a light hold hairspray.
Recommended Products:
Try Kevin Murphy MOTION.LOTION curl enhancer to define curls with frizz control.
Best Face Shape and Hair Type:
This look is suitable for oval, round or square shaped faces. This style works best on medium to thick hair.
Tip:
Accent with a cute vintage hat!
#21 REAR WINDOW
Written by Tanya Ramirez
This softly deconstructed after-hours hairstyle offers intrigue into the day’s affairs.
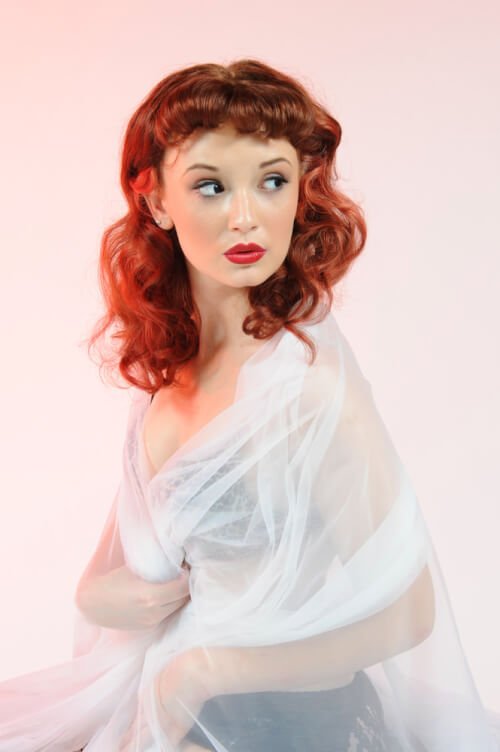
How To Style:
- Prep clean, dry hair with a light hold working hairspray.
- Create a full fringe roll using a large barrel curling iron. Curl hair forward and tuck under. Secure with bobby pins as needed.
- Create a soft center parting then begin curling hair using a medium barrel curling iron. Take small to medium-sized sections of hair and curl vertically in alternating directions from the mid-length down through to the ends. Allow curls to cool.
- Deconstruct curls gently using your fingertips. Backcomb lightly for extra fullness.
- Finish with a light hold hairspray.
Recommended Products:
Try Kevin Murphy UNDRESSED to create a loose, undone and natural look.
Best Face Shape and Hair Type:
This look is suitable for oval, round and heart shaped faces. This style works best on fine to thick hair.
Tip:
Accent with a pretty flower on one side.
#22 SOME LIKE IT HOT
Written by Tanya Ramirez
When frizz is your enemy, keep it smooth and controlled with this cute updo.
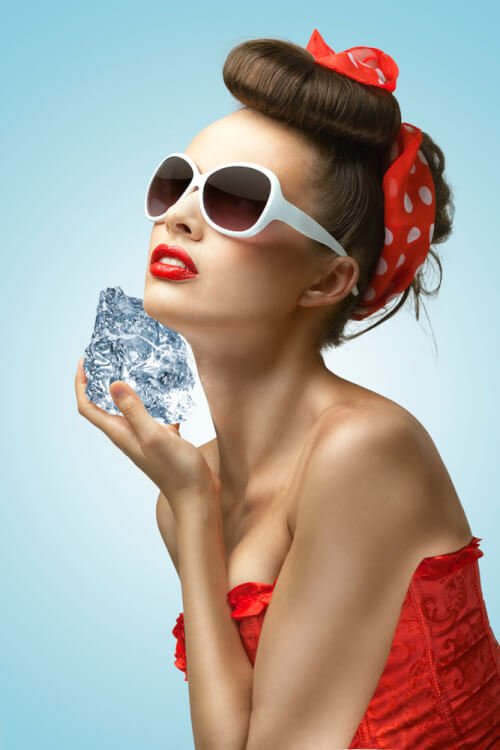
How To Style:
- Prep clean, dry hair with a light hold working hairspray.
- Begin with the fringe area. Create a horizontal parting from the crown area down to the ears. Gather hair from the fringe and sides to create a ponytail at the crown. Backcomb the underside interior of the hair. Gather ends and roll under to create your fringe roll. Use a hair donut, padding or gentle backcombing for extra support. Pin under as needed with bobby pins. Smooth the exterior of the fringe with a fine tooth comb and light hairspray.
- Next, brush remaining hair smooth and gather into a high ponytail. Take small sections from the ponytail and twist and pin small curls as desired, depending on the thickness of your hair. Secure with bobby pins as needed.
- Finish with a light hold hairspray.
Recommended Products:
Try TIGI Bed Head HARD HEAD Hairspray for superior hold and high shine.
Best Face Shape and Hair Type:
This look is suitable for oval, square and heart-shaped faces. This style works best on fine to medium hair.
Tip:
Accent with a cute vintage scarf.
#23 ANCHORS AWEIGH
Written by Tanya Ramirez
You’ll be ready to set off on new adventures with this adorable pin up-inspired hairstyle.

How To Style:
- Prep clean, dry hair with a light hold working hairspray.
- Create a full fringe roll using a large barrel curling iron. Curl hair forward and tuck/roll under. Secure with bobby pins as needed.
- Take small sections from the temple area and brush back to secure with a small hair tie.
- Curl hair using a large barrel curling iron. Take medium-sized sections of hair and curl vertically in alternating directions from the mid-length down through to the ends. Allow curls to cool.
- Deconstruct curls gently using your fingertips. Backcomb lightly for extra fullness.
- Finish with a light hold hairspray.
Recommended Products:
Try Oribe Apres Beach for touchable waves with beautiful shine.
Best Face Shape and Hair Type:
This look is suitable for round, oval or heart shaped faces. This style works best on medium to thick hair.
Tip:
Accent with your favorite sailor hat for a nautical look.
#24 A PLACE IN THE SUN
Written by Tanya Ramirez
Catch some rays with this tropical-inspired hair design.
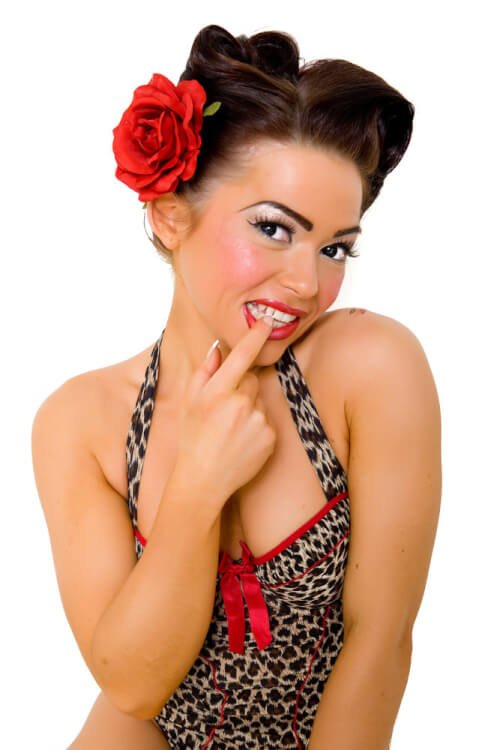
How To Style:
- Prep clean, dry hair with a light hold working hairspray.
- Create a soft side parting then divide hair into three sections: right, left and back areas.
- Begin on the right side and brush the area smooth. Use a flexible hairspray for control and to tame any flyaways. Take the ends and begin rolling up and back away from the face in a smooth and controlled motion. Use a hair donut, padding or gentle backcombing for extra support. Pin as needed with bobby pins.
- Next move to the fringe area. Take the fringe section and curl using a large barrel iron. Backcomb the underside and roll from the ends up. Secure with bobby pins as needed. Smooth the exterior of hair with your fingers and light hairspray.
- Next, brush hair smooth in the back area. Create a French twist by gathering ends and rolling hair towards the head in a vertical fashion. Secure with bobby pins as needed.
- Finish with a light hold hairspray.
Recommended Products:
Try Kevin Murphy YOUNG.AGAIN treatment oil for smooth, shiny hair.
Best Face Shape and Hair Type:
This look is suitable for oval, square and round face shapes. This style works best on medium hair to thick hair.
Tip:
Accent with an oversized flower pin.
#25 NONE BUT THE LONELY HEART
Written by Tanya Ramirez
You’ll certainly find love in all the right places with this sweet look.
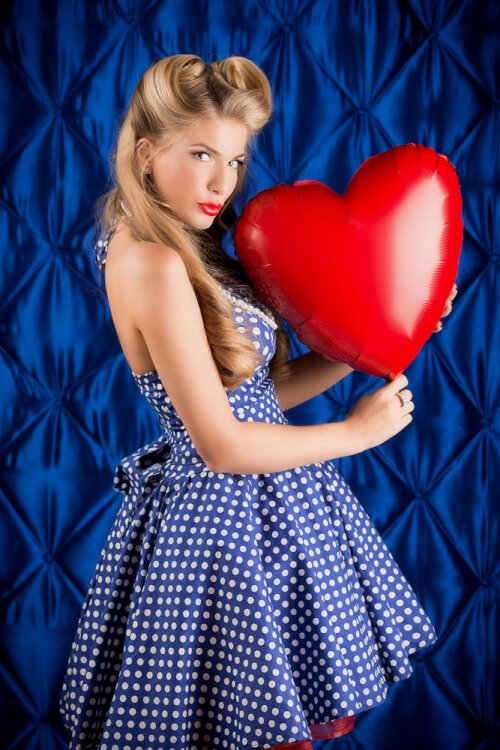
How To Style:
- Prep clean, dry hair with a light hold working hairspray.
- Create a clean side parting then divide hair into three sections: right, left and back areas.
- Begin on the right side and brush the area smooth. Use a flexible hairspray for control and to tame any flyaways. Take the ends and begin rolling upward toward the head in a smooth and controlled motion. Use a hair donut, padding or gentle backcombing for extra support. Pin as needed with bobby pins. Keep the finish soft and romantic.
- Repeat the steps noted above on the left side. Roll the fringe separately by gathering hair ends and rolling from the ends up to create a soft ‘C’ shaped curl. Be sure your rolls are neat and soft. Smooth the exterior of both rolls with your fingers and light hairspray.
- Next, brush hair smooth in the back area. Create two soft, spiral curls on the ends only with a large barrel iron in a vertical fashion. Release curls and allow to fall softly.
- Finish with a light hold hairspray.
Recommended Products:
Try Kevin Murphy FULL.AGAIN thickening lotion for fullness and body with natural movement.
Best Face Shape and Hair Type:
This look is suitable for oval, round or square shaped faces. This style works best on medium to thick hair.
Tip:
Accent this look with a fascinator and lace netting.
#26 BLUE HAWAII
Written by Tanya Ramirez
This look will have you ready to Rock-a-Hula with your favorite island baby.
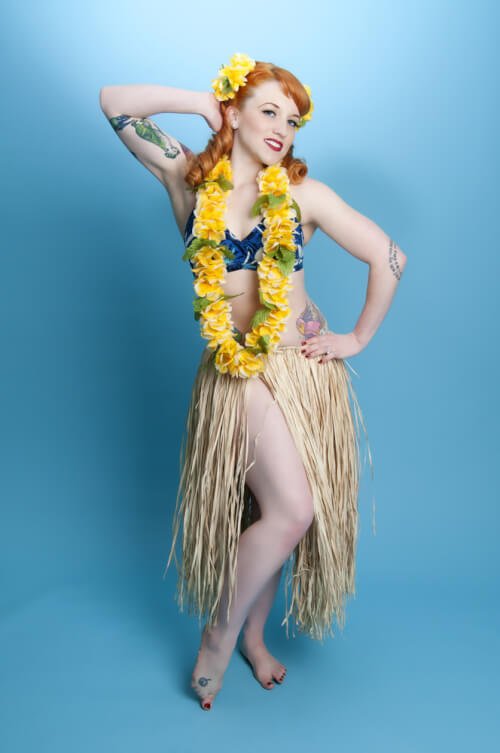
How To Style:
- Prep clean, dry hair with a light hold working hairspray.
- Create a clean side parting. Curl fringe forward using a small barrel curling iron and sweep gently over to one side.
- Take the right side and brush hair smooth in an upward fashion and secure with a bobby pin.
- Then begin curling hair using a medium barrel curling iron. Take small to medium-sized sections of hair and curl vertically toward the face from the mid-length down through to the ends. Allow curls to cool.
- Finish with a light hold hairspray.
Recommended Products:
Try Kevin Murphy BODY.GUARD leave-in creme to smooth and protect hair with extra shine.
Best Face Shape and Hair Type:
This look is suitable for round, oval or heart shaped faces. This style works best on fine to thick hair.
Tip:
Accent with some tropical flowers.
#27 CRYBABY
Written by Tanya Ramirez
Take no prisoners with this Wanda Woodward-inspired hairstyle.
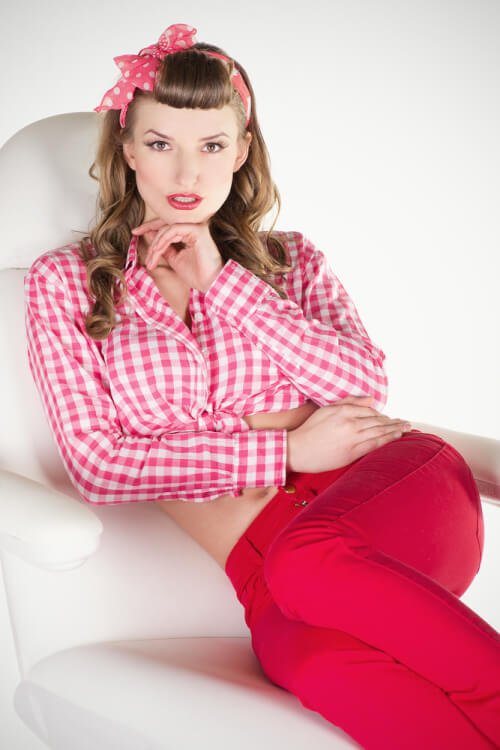
How To Style:
- Prep clean, dry hair with a light hold working hairspray.
- Create a mock baby bangs (fringe) roll using a medium barrel curling iron. Curl hair forward and tuck/roll under. Backcomb underside for extra support. Secure with bobby pins as needed.
- Sweep sides up and away from face and secure with bobby pins.
- Curl remaining hair using a large barrel curling iron. Curl medium-sized sections of hair vertically in alternating directions from the ends up to the mid-length. Allow curls to cool.
- Deconstruct curls gently using your fingertips. Backcomb lightly for extra fullness.
- Finish with a light hold hairspray.
Recommended Products:
Try DermOrganic Fast Drying Shaping Spray for great hold with touchable texture.
Best Face Shape and Hair Type:
This look is suitable for oval, round and heart shaped faces. This style works best on fine to thick hair.
Tip:
Accent with a cute polka-dot headband.
#28 FOREVER, DARLING
Written by Tanya Ramirez
Capture an era with this slick style that’s smart and classy.
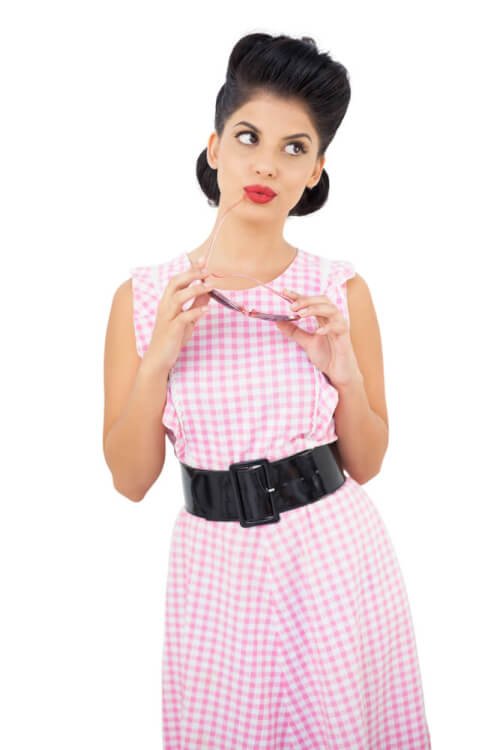
How To Style:
- Prep clean, dry hair with a light hold working hairspray.
- Begin with the fringe area. Create a horizontal parting from the crown and brush hair forward. Backcomb the surface of the hair. Gather ends straight up, smooth the underside so you have a smooth surface as you roll hair from the ends down toward the head to create your fringe roll. Use a hair donut, padding or gentle backcombing for extra support. Pin as needed with bobby pins. Smooth the exterior of the fringe with a fine tooth comb and light hairspray.
- Next, sweep the sides up and away from face and secure.
- Brush hair smooth in the back area. Backcomb the base interior of the hair from the nape downward. Gather ends then tuck and roll under and upwards toward the nape to create your style. Secure at the base of the neck using bobby pins.
- Finish with a hard-hold/high shine hairspray.
Recommended Products:
Try TIGI Bed Head HARD HEAD Hairspray for superior hold and high shine.
Best Face Shape and Hair Type:
This look is suitable for oval, square and round face shapes. This style works best on medium to thick hair.
Tip:
Accent with a vintage lace net.
#29 HOW THE WEST WAS WON
Written by Tanya Ramirez
Explore new horizons with this classic look that’s both wild and twisted.
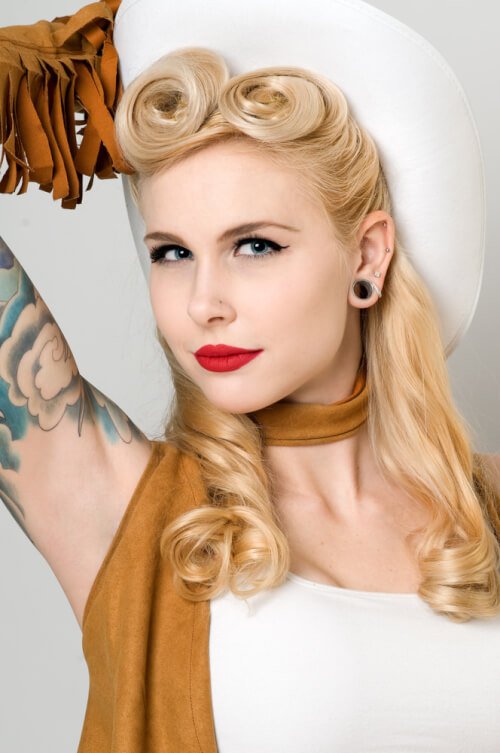
How To Style:
- Prep clean, dry hair with a light hold working hairspray.
- Begin with the fringe area. Create a horizontal parting beginning at the crown and brush hair forward. Gather ends and roll hair to create your pin curled fringe roll.
- Next, take hair from the left side temple area and sweep up from the ends to create your next pin curled roll. Secure as needed with bobby pins.
- Take any remaining hair from the side areas and sweep up to secure at the crown area.
- Brush remaining hair smooth in the back area. Create soft curls with a large barrel iron. Curl hair towards the face from the mid-length through to ends in a vertical fashion. Set curls using pin curl clips until all hair is curled. Allow hair to cool then release curls and allow to fall softly.
- Finish with a light hold hairspray.
Recommended Products:
Try Kevin Murphy BODY.BUILDER Volumizing Mousse for flexible fullness and hold.
Best Face Shape and Hair Type:
This look is suitable for round, oval or round face shapes. This style works best on medium to thick hair.
Tip:
Accent with your favorite fancy hat!
#30 IT HAPPENED ONE NIGHT
Written by Tanya Ramirez
Get ready for that closeup with this decadent style.
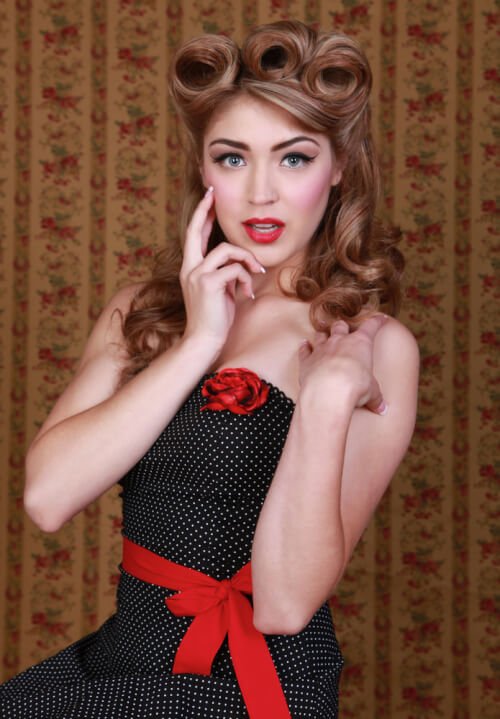
How To Style:
- Prep clean, dry hair with a light hold working hairspray.
- Create a soft side parting and clip a small fringe section away to start.
- To begin your three stand-up pin curls, take the center crown section and brush hair smooth. Backcomb the underside, take the hair ends up and roll downward toward the head.
- Then take the right section and brush the area smooth. Use a light hold gel or light spray wax for control and to tame any flyaways. Take the ends and begin rolling hair upward toward the head in a smooth and controlled motion for a smooth ‘C’ shaped curl.
- Repeat the steps noted above on the left side. Be sure your rolls are symmetrical. Smooth the exterior of both rolls with a fine tooth comb and light hairspray.
- Take any remaining hair from the sides and sweep them back away from the face and secure with bobby pins.
- Return to the small fringe section and smooth over to one side and pin into place.
- Next, brush hair smooth in the back area. Create soft curls with a large barrel iron. Curl hair from the mid-length through to ends in a vertical fashion toward the face. Release curls and allow to fall softly. Backcomb ends gently for a soft, voluminous finish.
- Finish with a light hold hairspray.
Recommended Products:
Try Kevin Murphy FRESH.HAIR for perfect next-day hair.
Best Face Shape and Hair Type:
This look is suitable for round, oval or square shaped faces. This style works best on medium to thick hair.
Tip:
Set your look with a light hold spray wax.
Now you have plenty of eye-catching pin up hairstyles to wear all calendar year. Get inspired by the screen sirens of yesteryear and get dolled up with these gorgeous glam looks!
